Install NeoStor on UGREEN NASync DXP2800
From USB installer to your first shared workspace. For UGREEN NASync DXP2800 (Intel-based only, non-GT model).
Before you begin.
Have a USB keyboard, a connected monitor, a USB flash drive and your licence email ready. The email contains your licence serial number and the ISO download link.
Check your hardware.
Use a UGREEN NASync DXP2800 (Intel-based only, non-GT model) with at least one hard drive installed.
Connect the network cable.
Connect the DXP2800 by Ethernet to a network with Internet access and an active DHCP server. It must be able to obtain an IP address automatically when it starts.
Create the installation USB.
Download neostor.iso using the ISO download link in your licence email. Use a tool such as balenaEtcher to select the image, select your USB flash drive and flash it. Wait for writing and validation to finish, then insert the USB drive into the DXP2800.
Flashing erases the USB drive. Write the image with the flashing tool; copying the ISO file onto the drive is not sufficient.
Configure the BIOS.
Open the BIOS and check its version.
Power on the DXP2800 and press Ctrl + F2 during startup. Before changing any settings, open the Main tab and check BIOS Version. It must read
EM_DXP2800_V1.0.26, as shown below. This procedure requires BIOS version 1.0.26.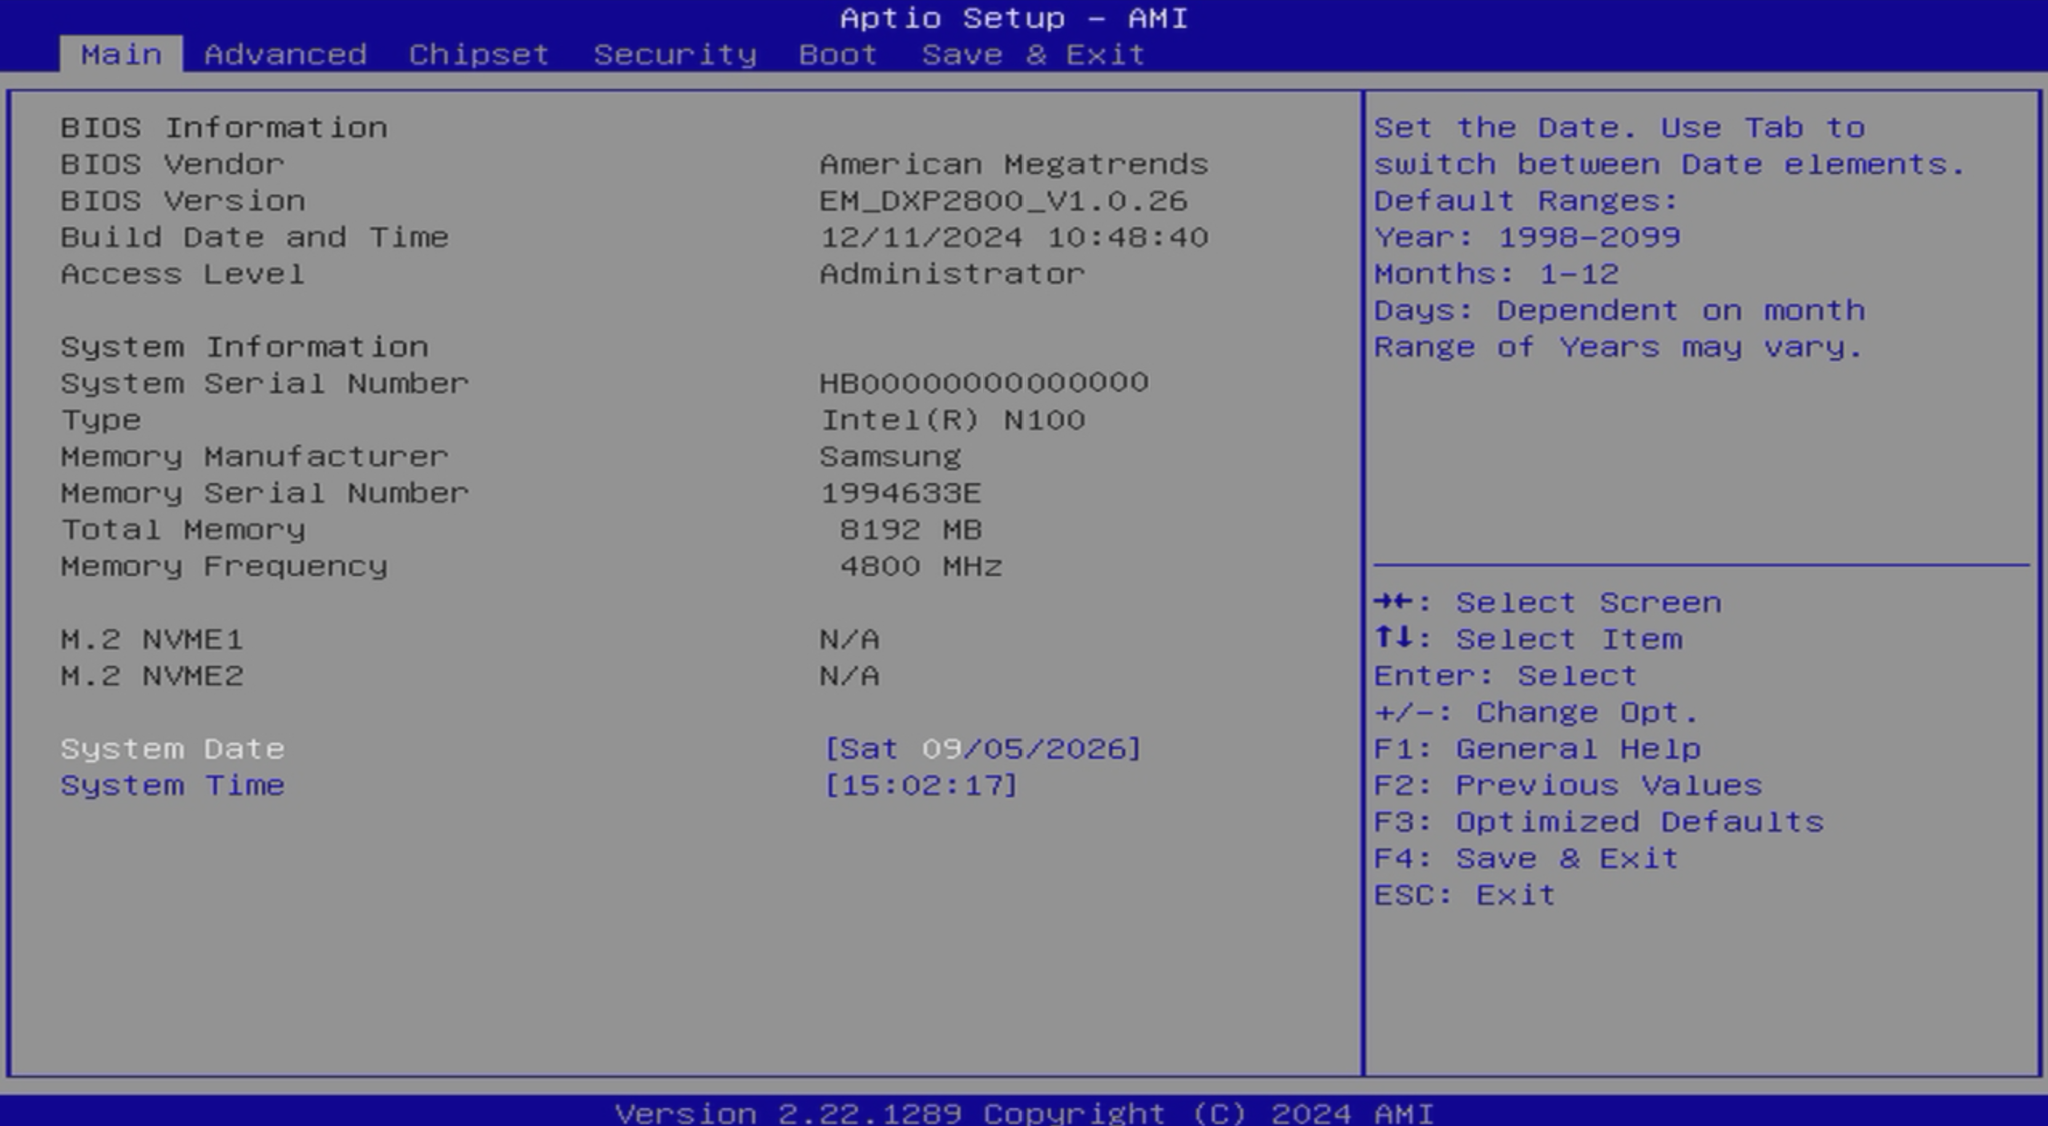
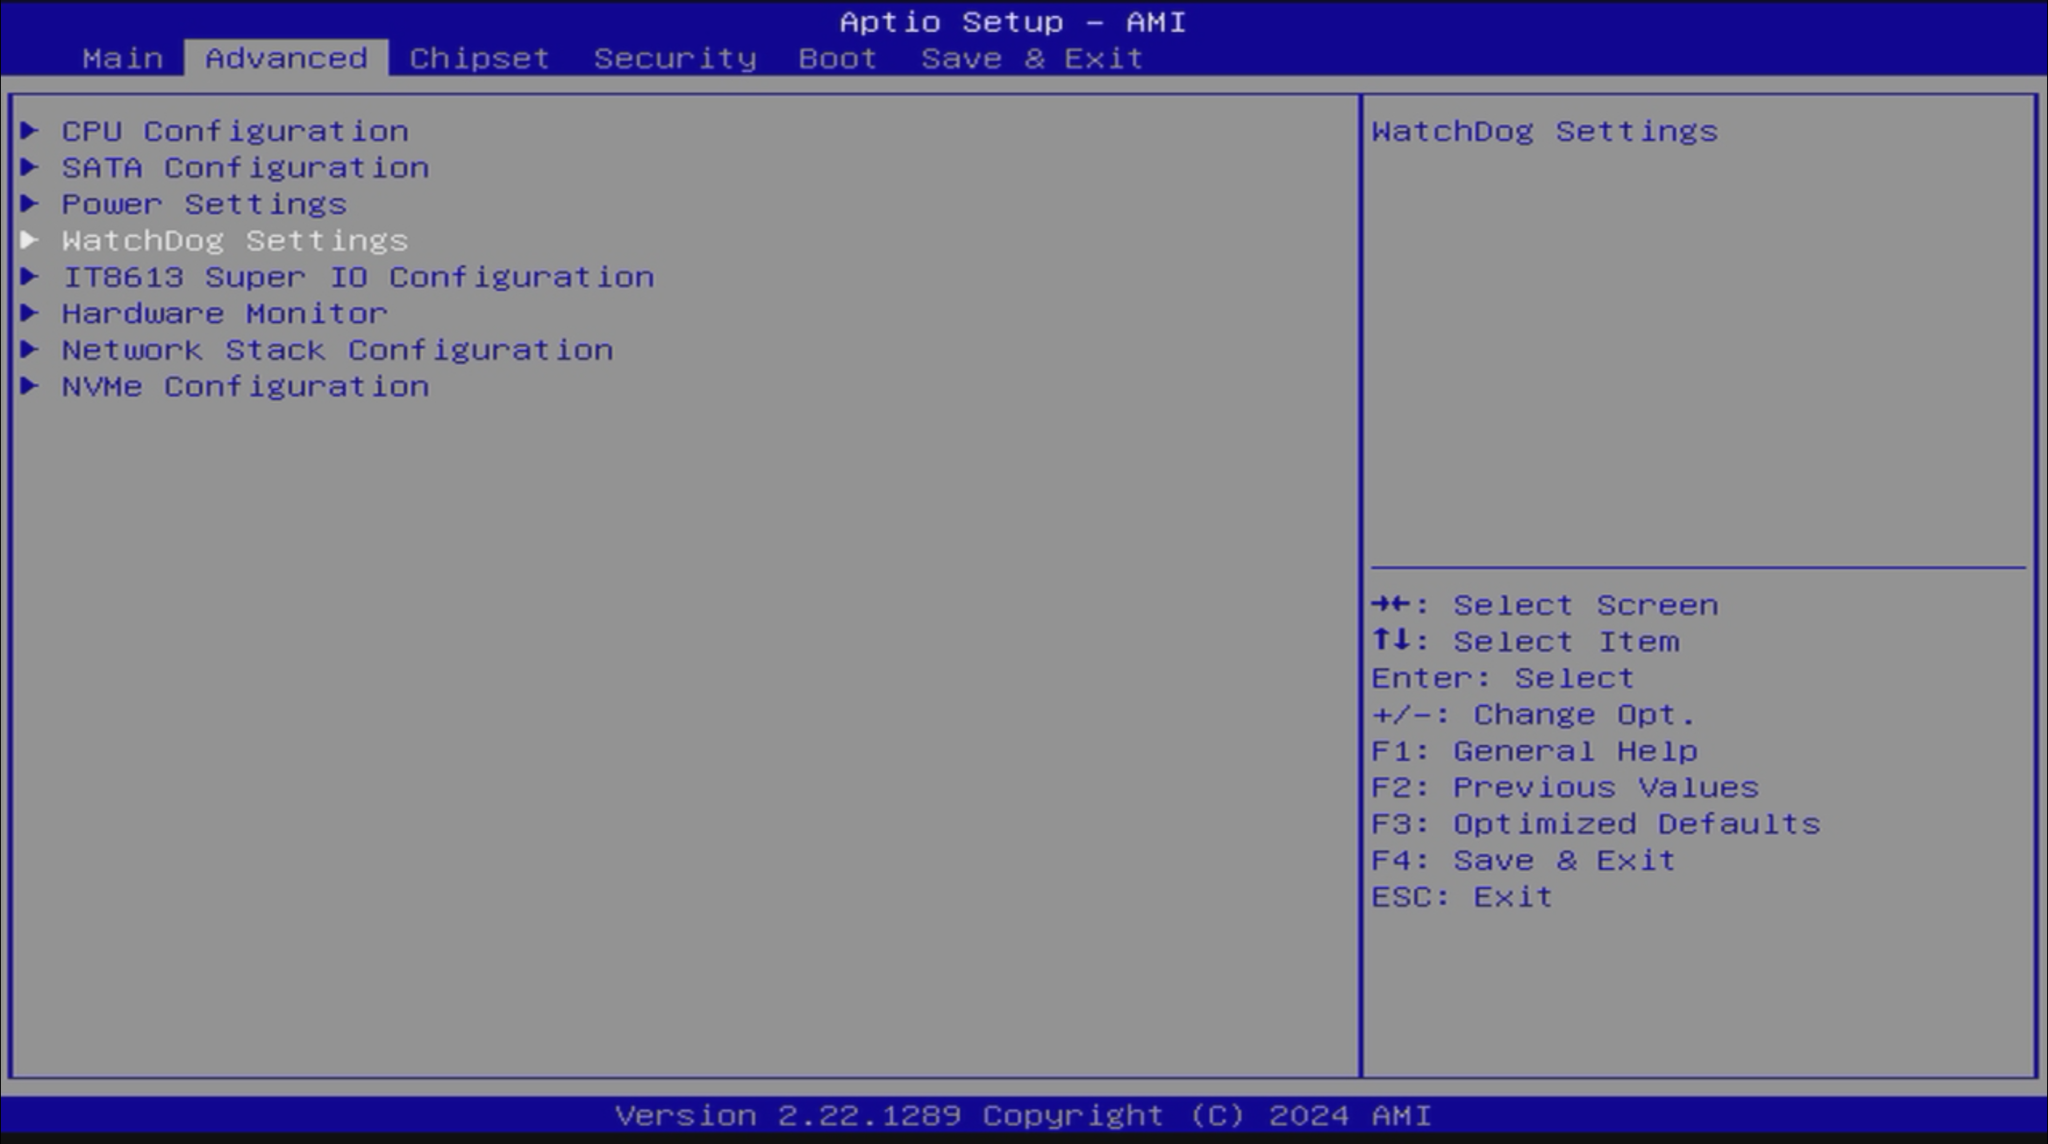
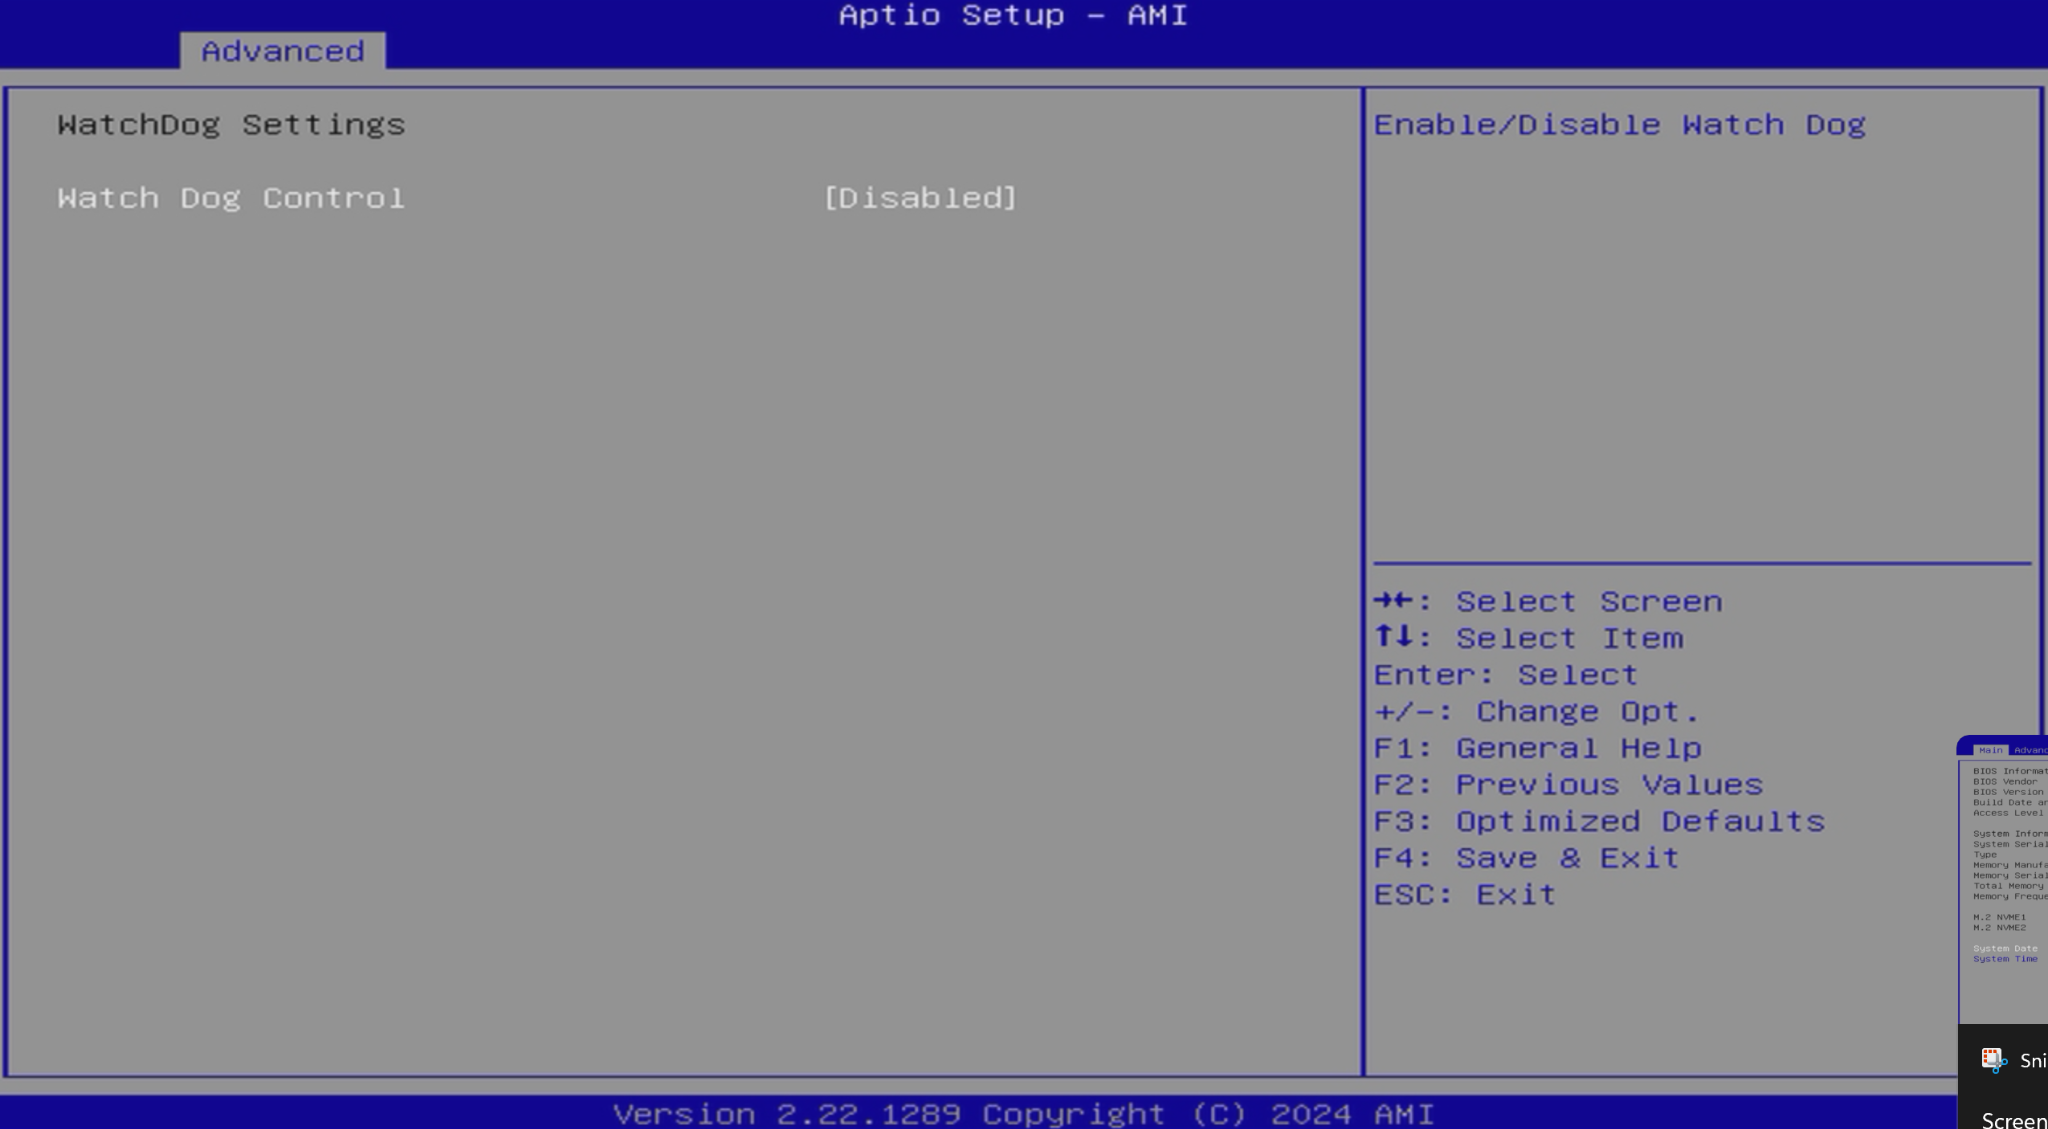
Main: BIOS Version must read EM_DXP2800_V1.0.26. Disable the watchdog and double-check the setting.
Open Advanced → WatchDog Settings and set Watch Dog Control to Disabled.
Set the boot order.
On the Boot tab, find FIXED BOOT ORDER Priorities. Set Boot Option #1 to the UEFI entry for your USB flash drive. If the intended installation disk is listed, set Boot Option #2 to its UEFI entry: either the built-in eMMC or your NVMe SSD.
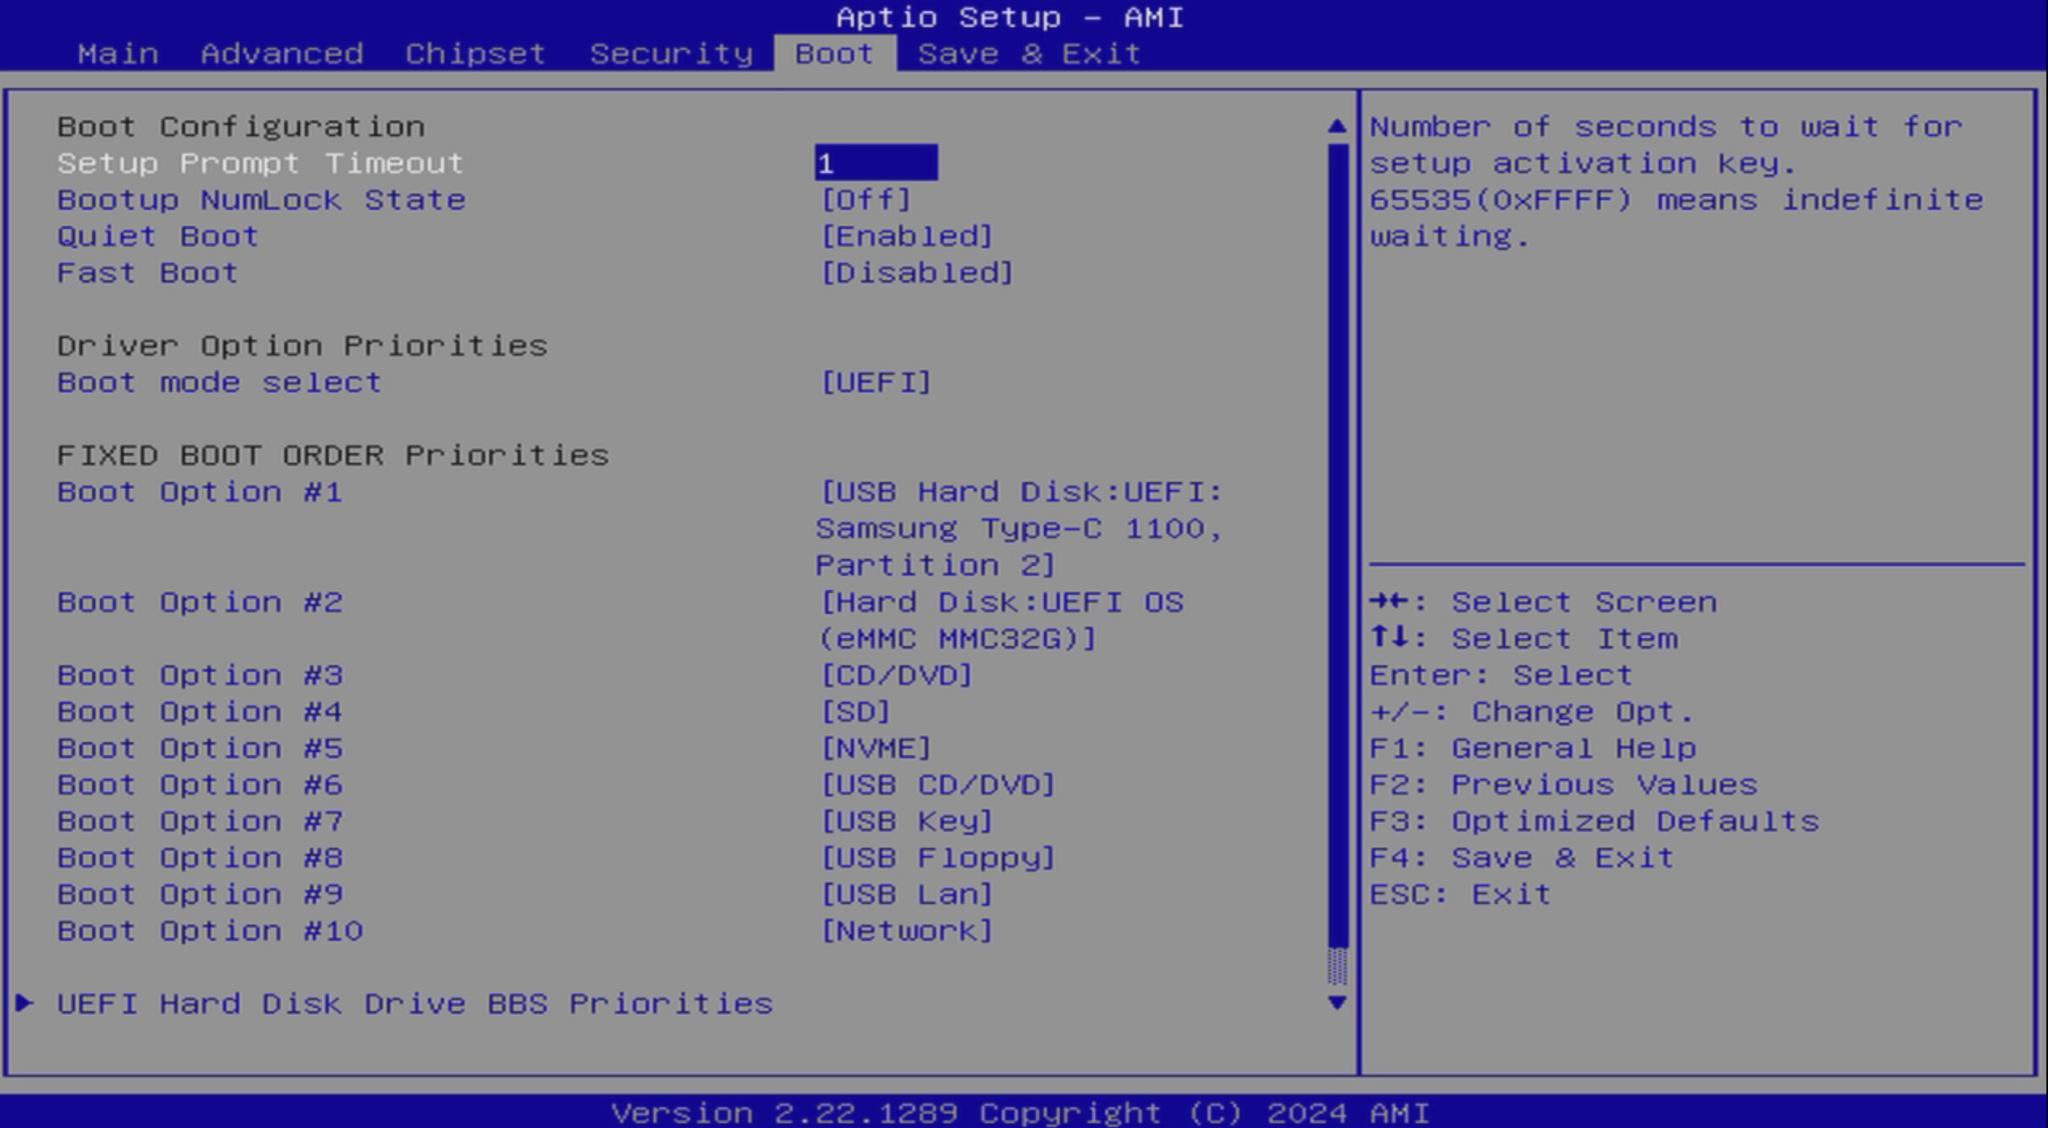
Example: USB drive first, installation disk second. The built-in eMMC is shown here; you can also install to an NVMe SSD. The USB brand and model will differ from the example. In this screenshot, the eMMC entry is shown as
UEFI OS (eMMC MMC32G).Prepare Secure Boot for installation.
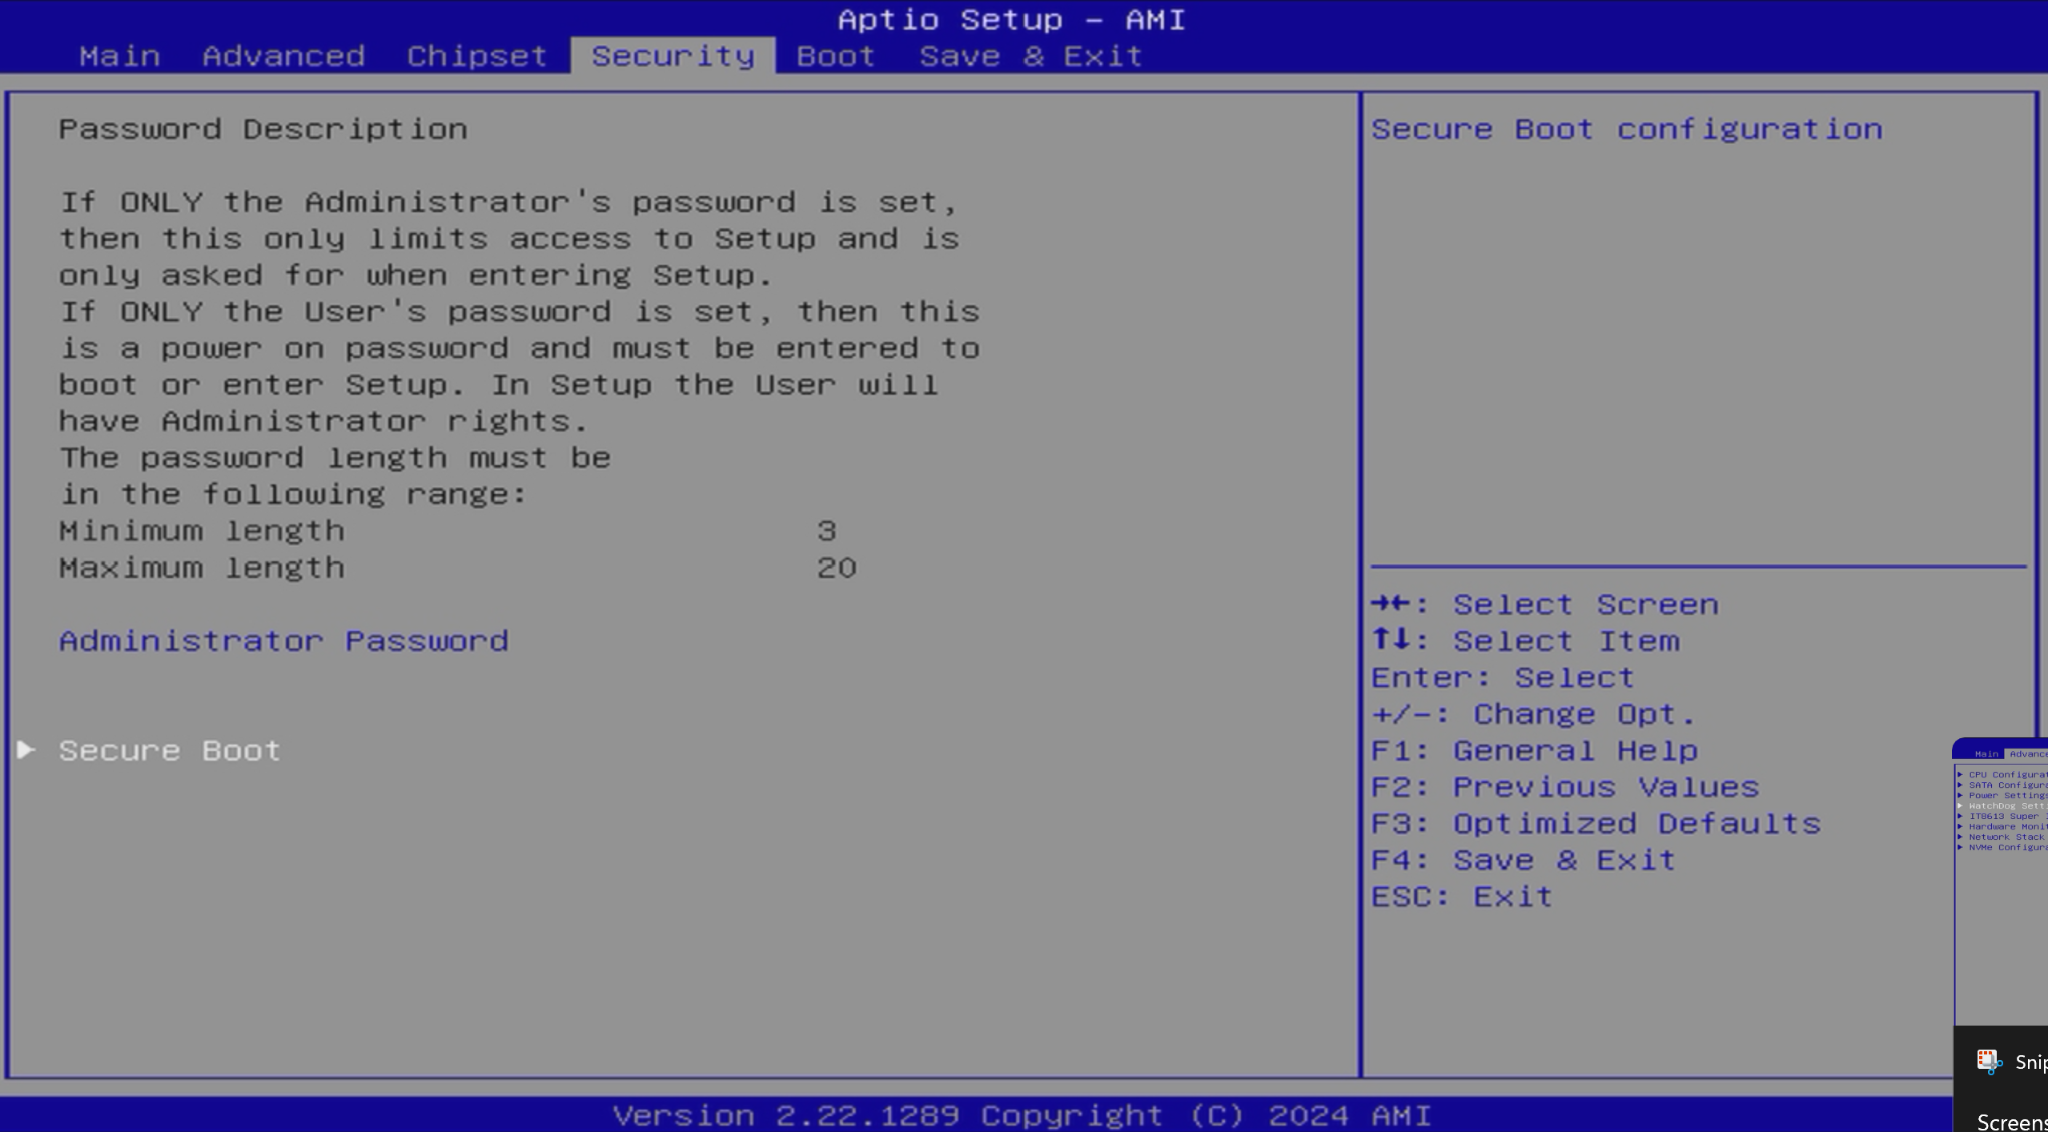
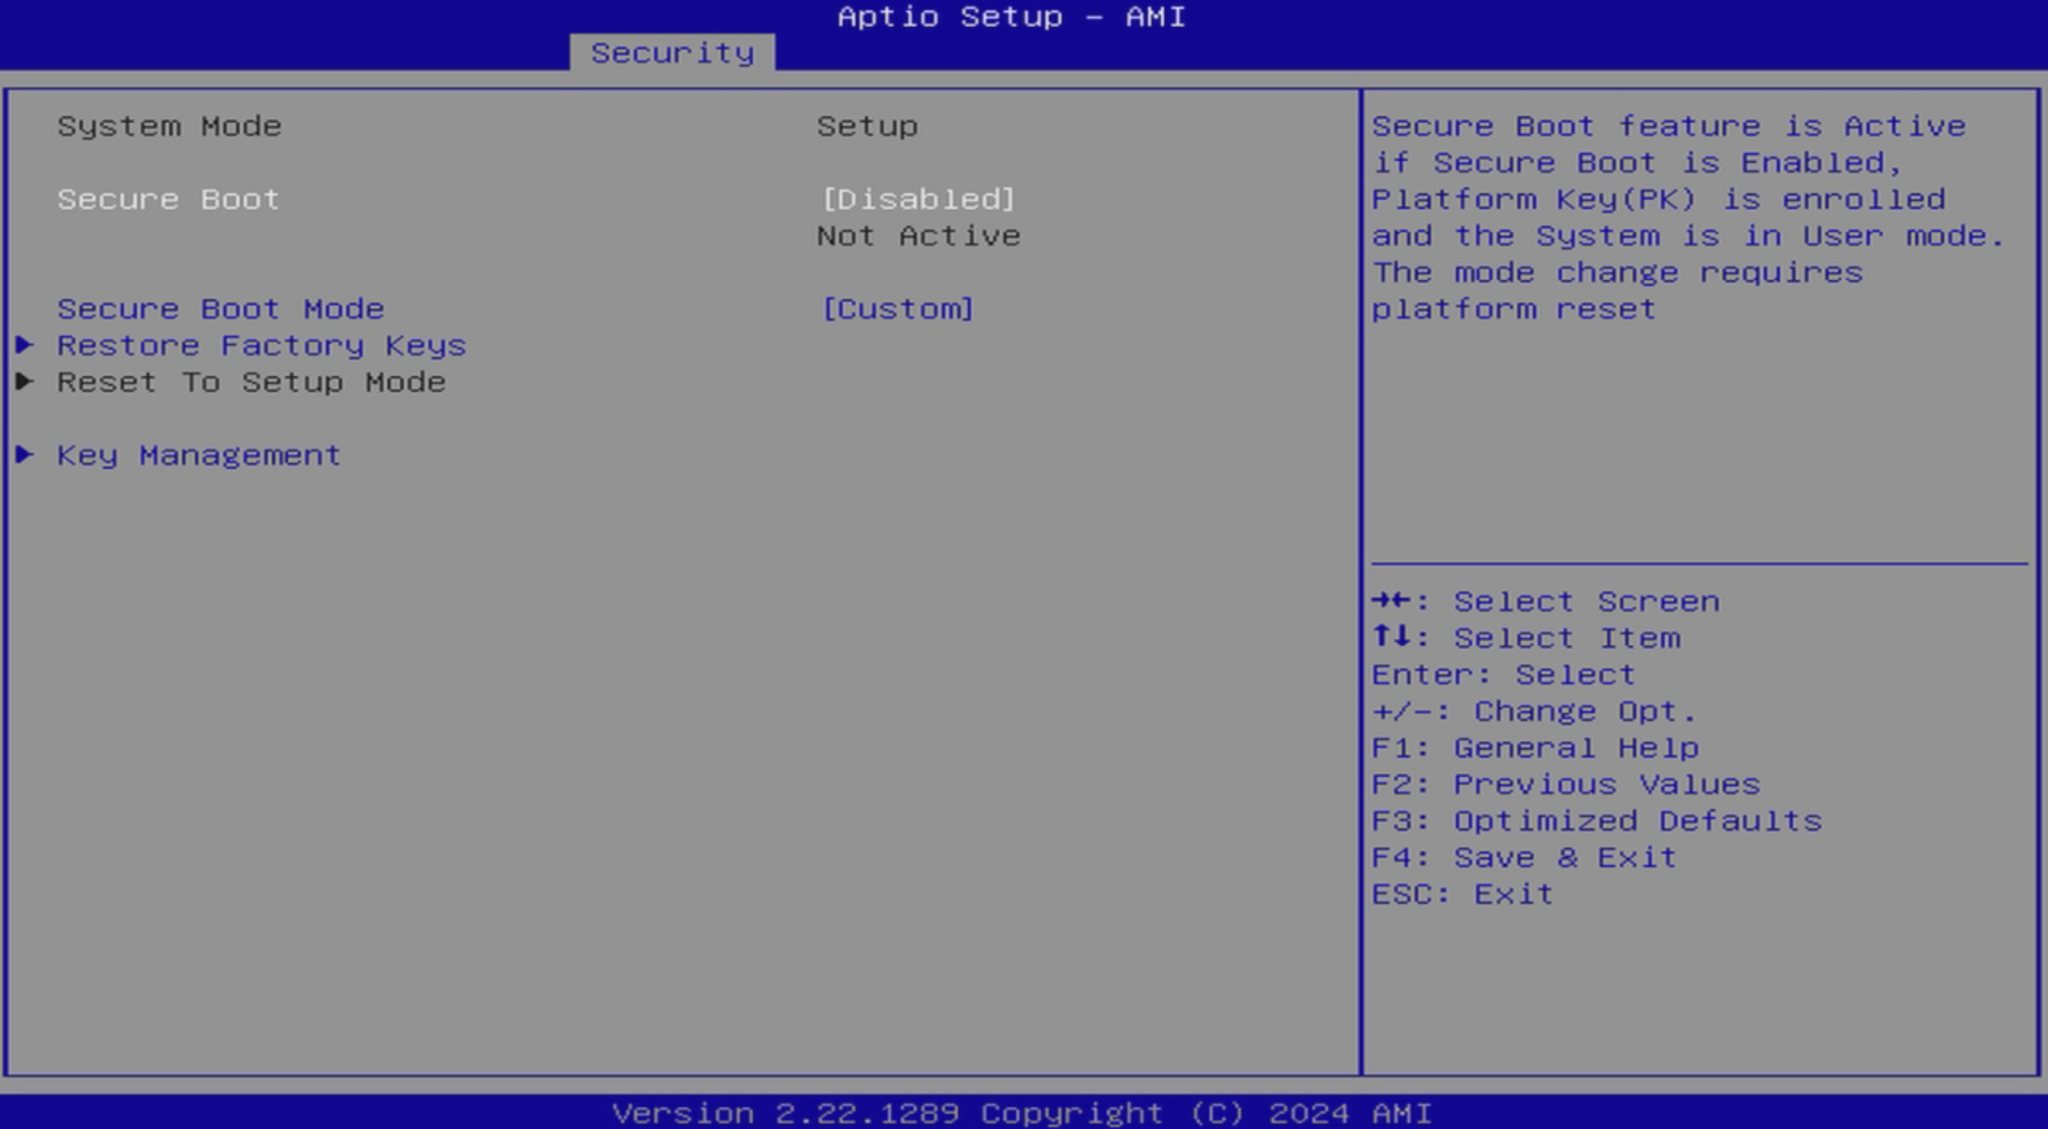
On the Security tab, open Secure Boot and set Secure Boot to Disabled. Check System Mode. If it does not read Setup, select Reset To Setup Mode.
Before continuing, verify that System Mode reads Setup and Secure Boot remains Disabled. Once Setup mode is active, Reset To Setup Mode should be unavailable (greyed out).
NeoStor will enrol its Secure Boot keys during the first boot after installation.
Save and restart.
Press F4 to save the BIOS settings and restart from the installation USB.
Install NeoStor.
Start the installer.
At the first Clonezilla screen, leave Clonezilla live with img neostor (VGA 800x600) selected and press Enter.
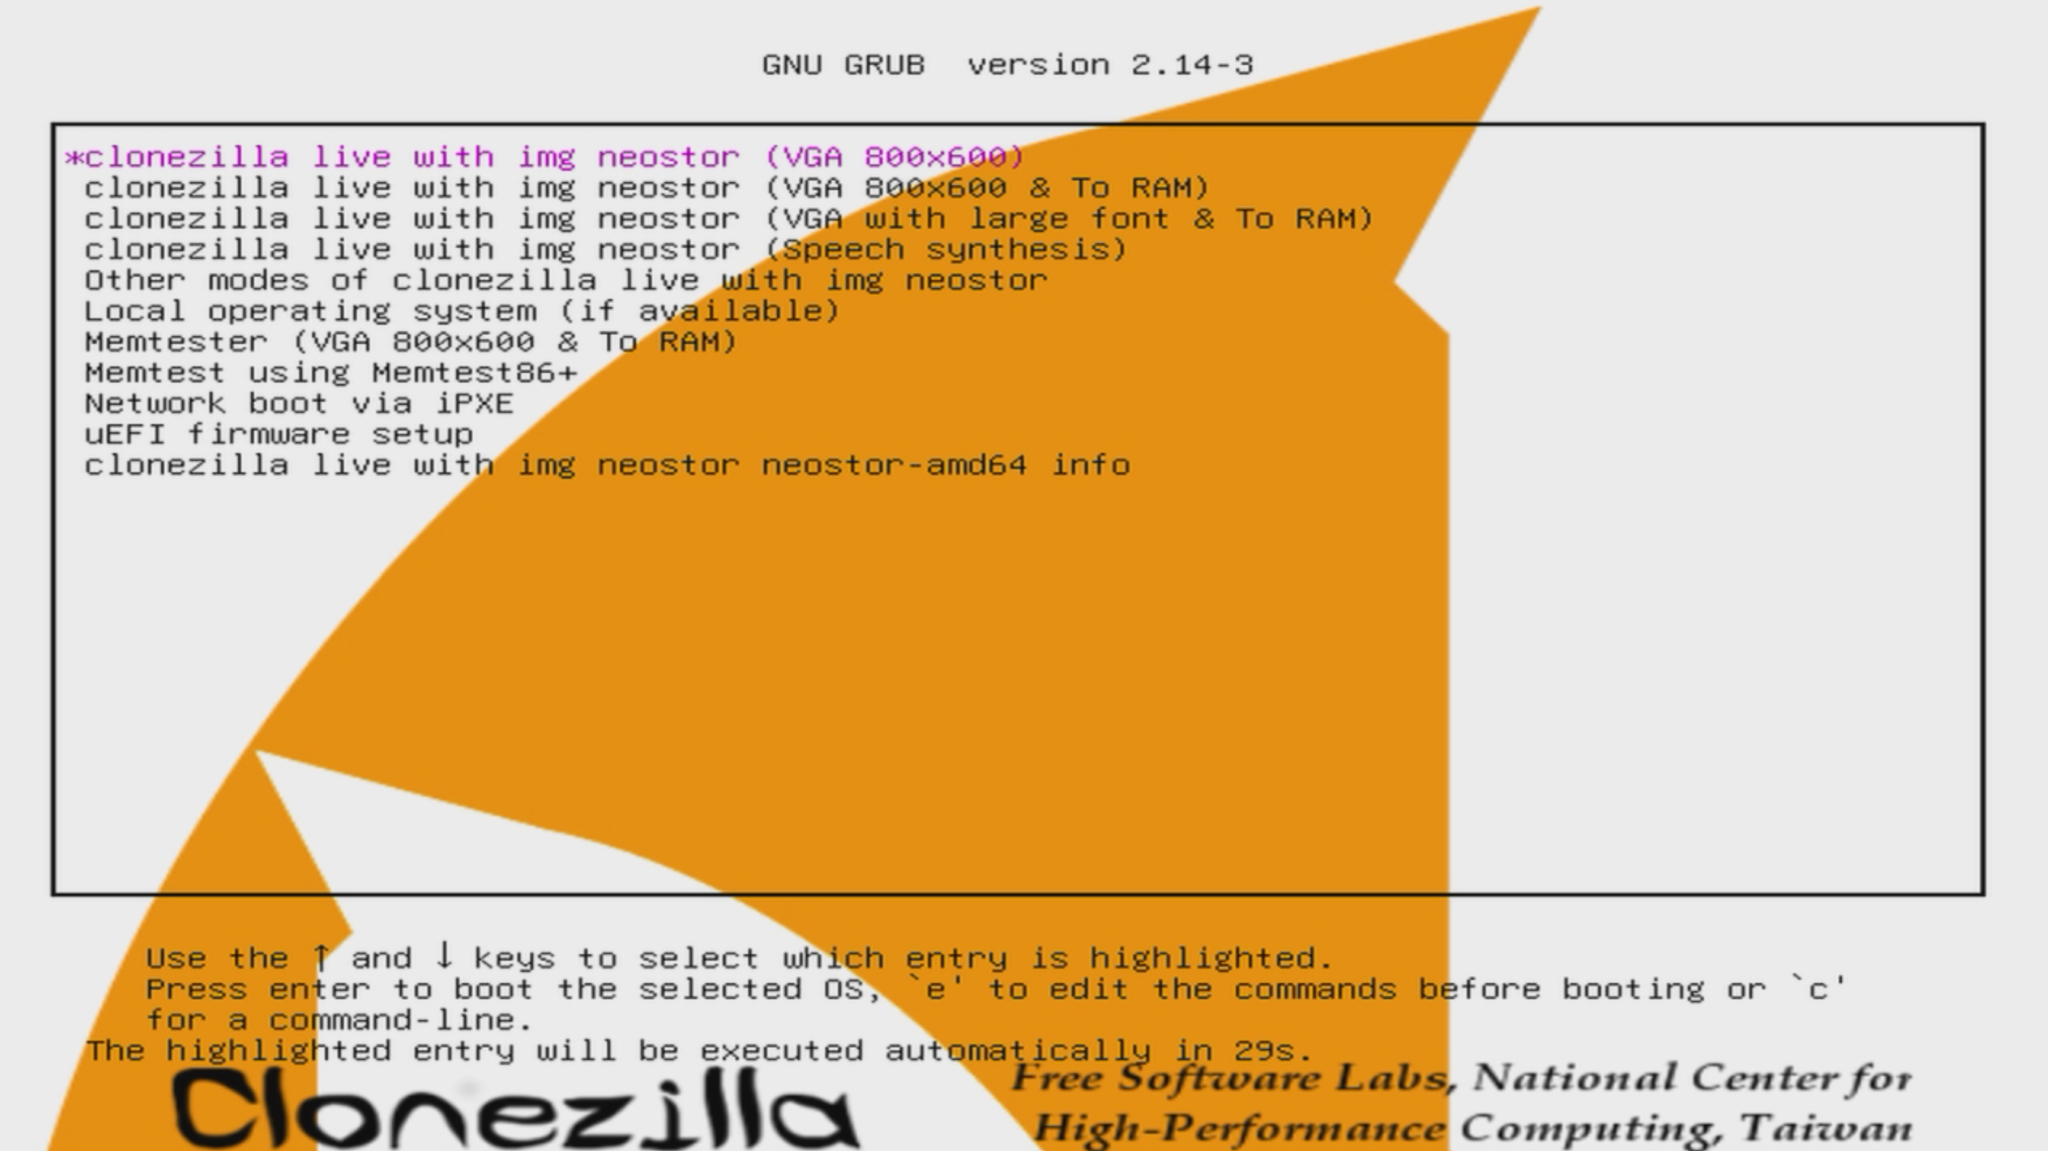
Leave the first Clonezilla entry selected and press Enter. Choose the installation disk carefully.
We recommend installing NeoStor on the built-in eMMC (
mmcblk0). You can also install it on an NVMe SSD. The eMMC capacity varies by hardware revision.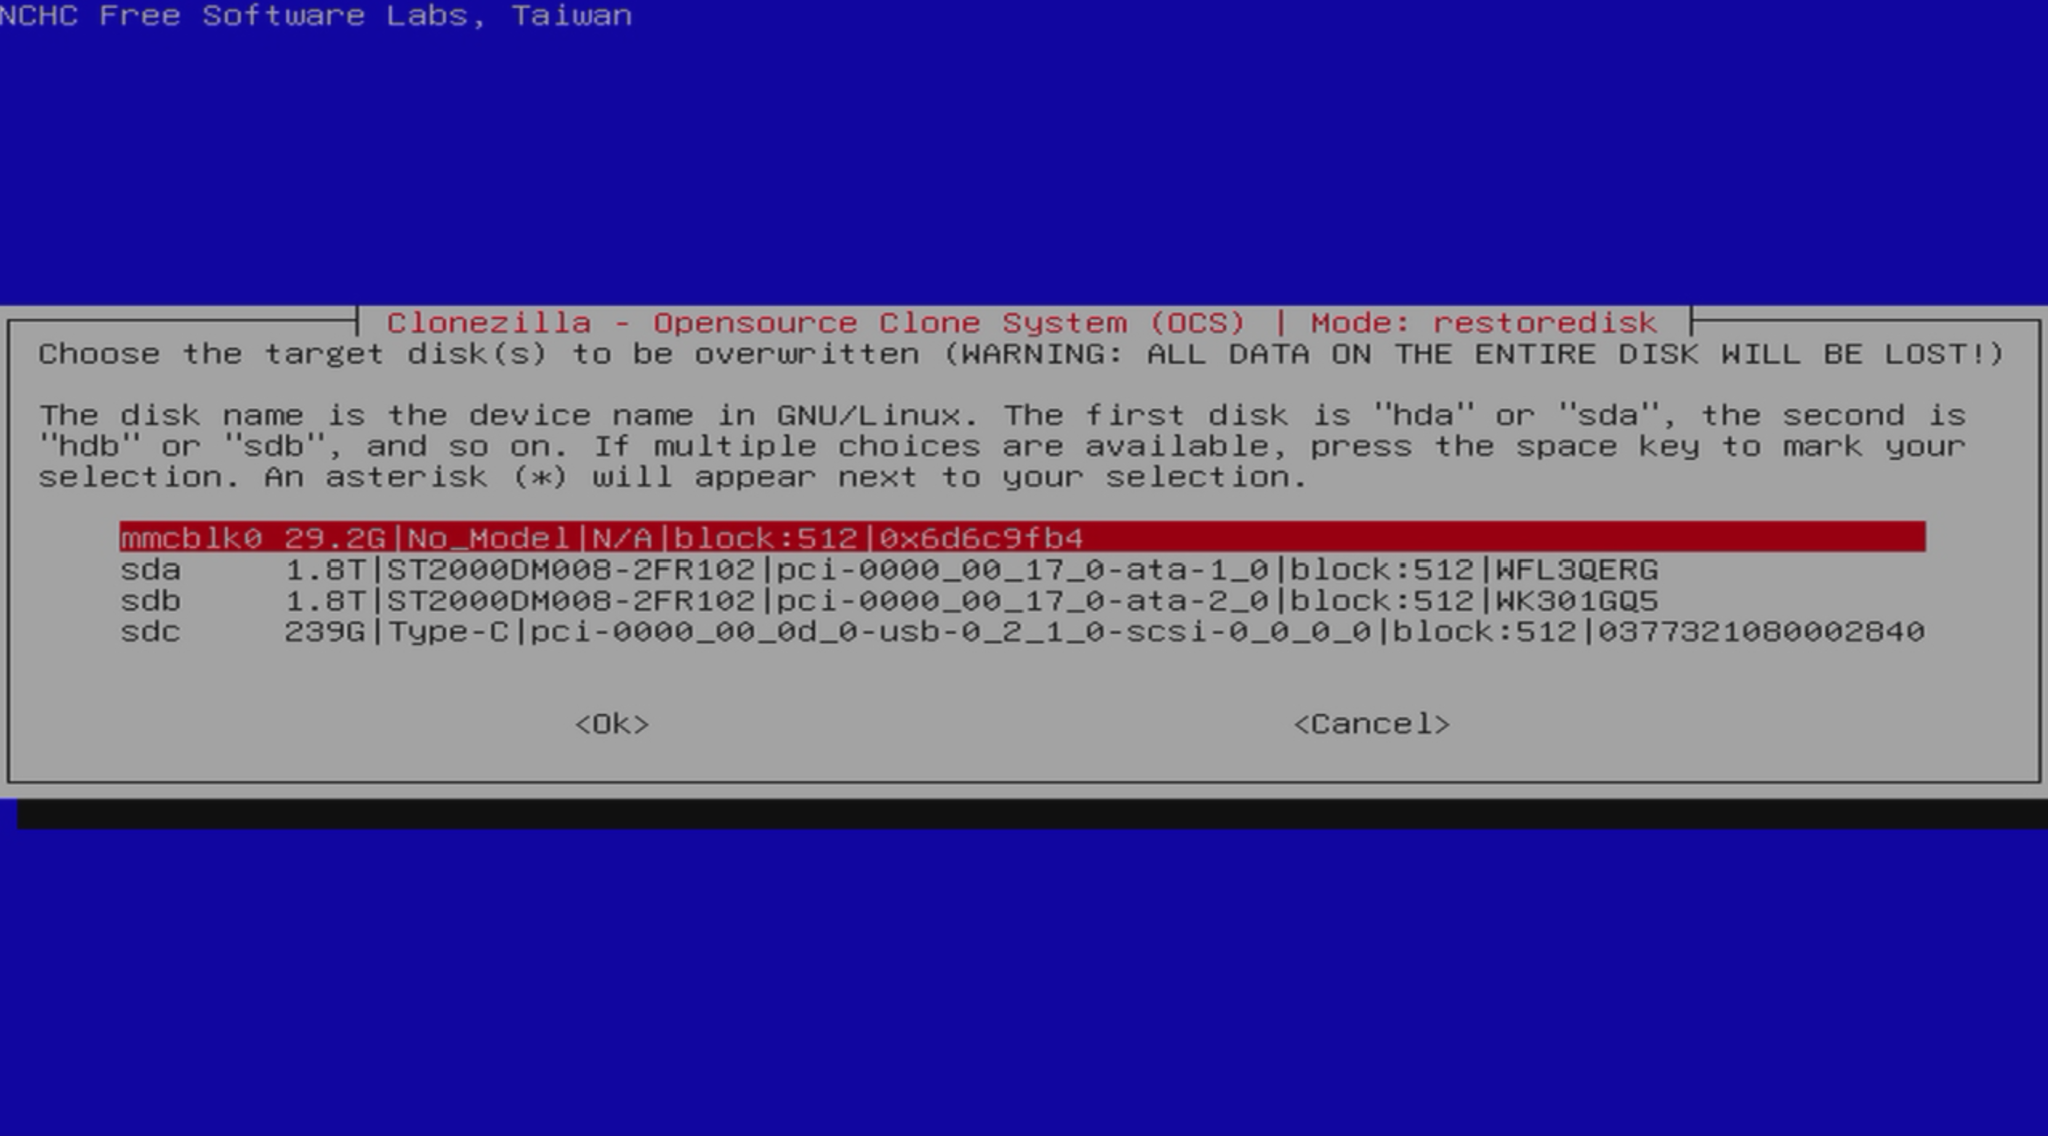
The built-in eMMC is shown as mmcblk0 in this example. Its capacity varies by hardware revision. An NVMe SSD can also be used as the installation disk. Wait for the installation to finish.
Let Clonezilla complete the image restoration. The DXP2800 will shut down when installation is finished.
Remove the USB and power on.
Once the DXP2800 has shut down, remove the installation USB. Power it on again to boot NeoStor from the selected installation disk. If needed, select that disk's UEFI boot entry in the BIOS.
Enrol the keys, then enable Secure Boot.
Wait for key enrolment.
On its first boot, NeoStor installs and verifies its Secure Boot keys. Wait for the message Secure Boot keys installed successfully.
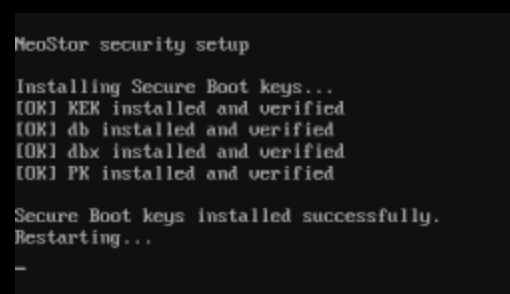
Wait for Secure Boot keys installed successfully before the restart. Return to the BIOS.
When the server restarts, press Ctrl + F2 during startup to open BIOS setup again. If NeoStor first prompts you to press any key to restart, do so.
Enable Secure Boot.
Open Security, then Secure Boot. Set Secure Boot to Enabled. Press F4 to save and restart.
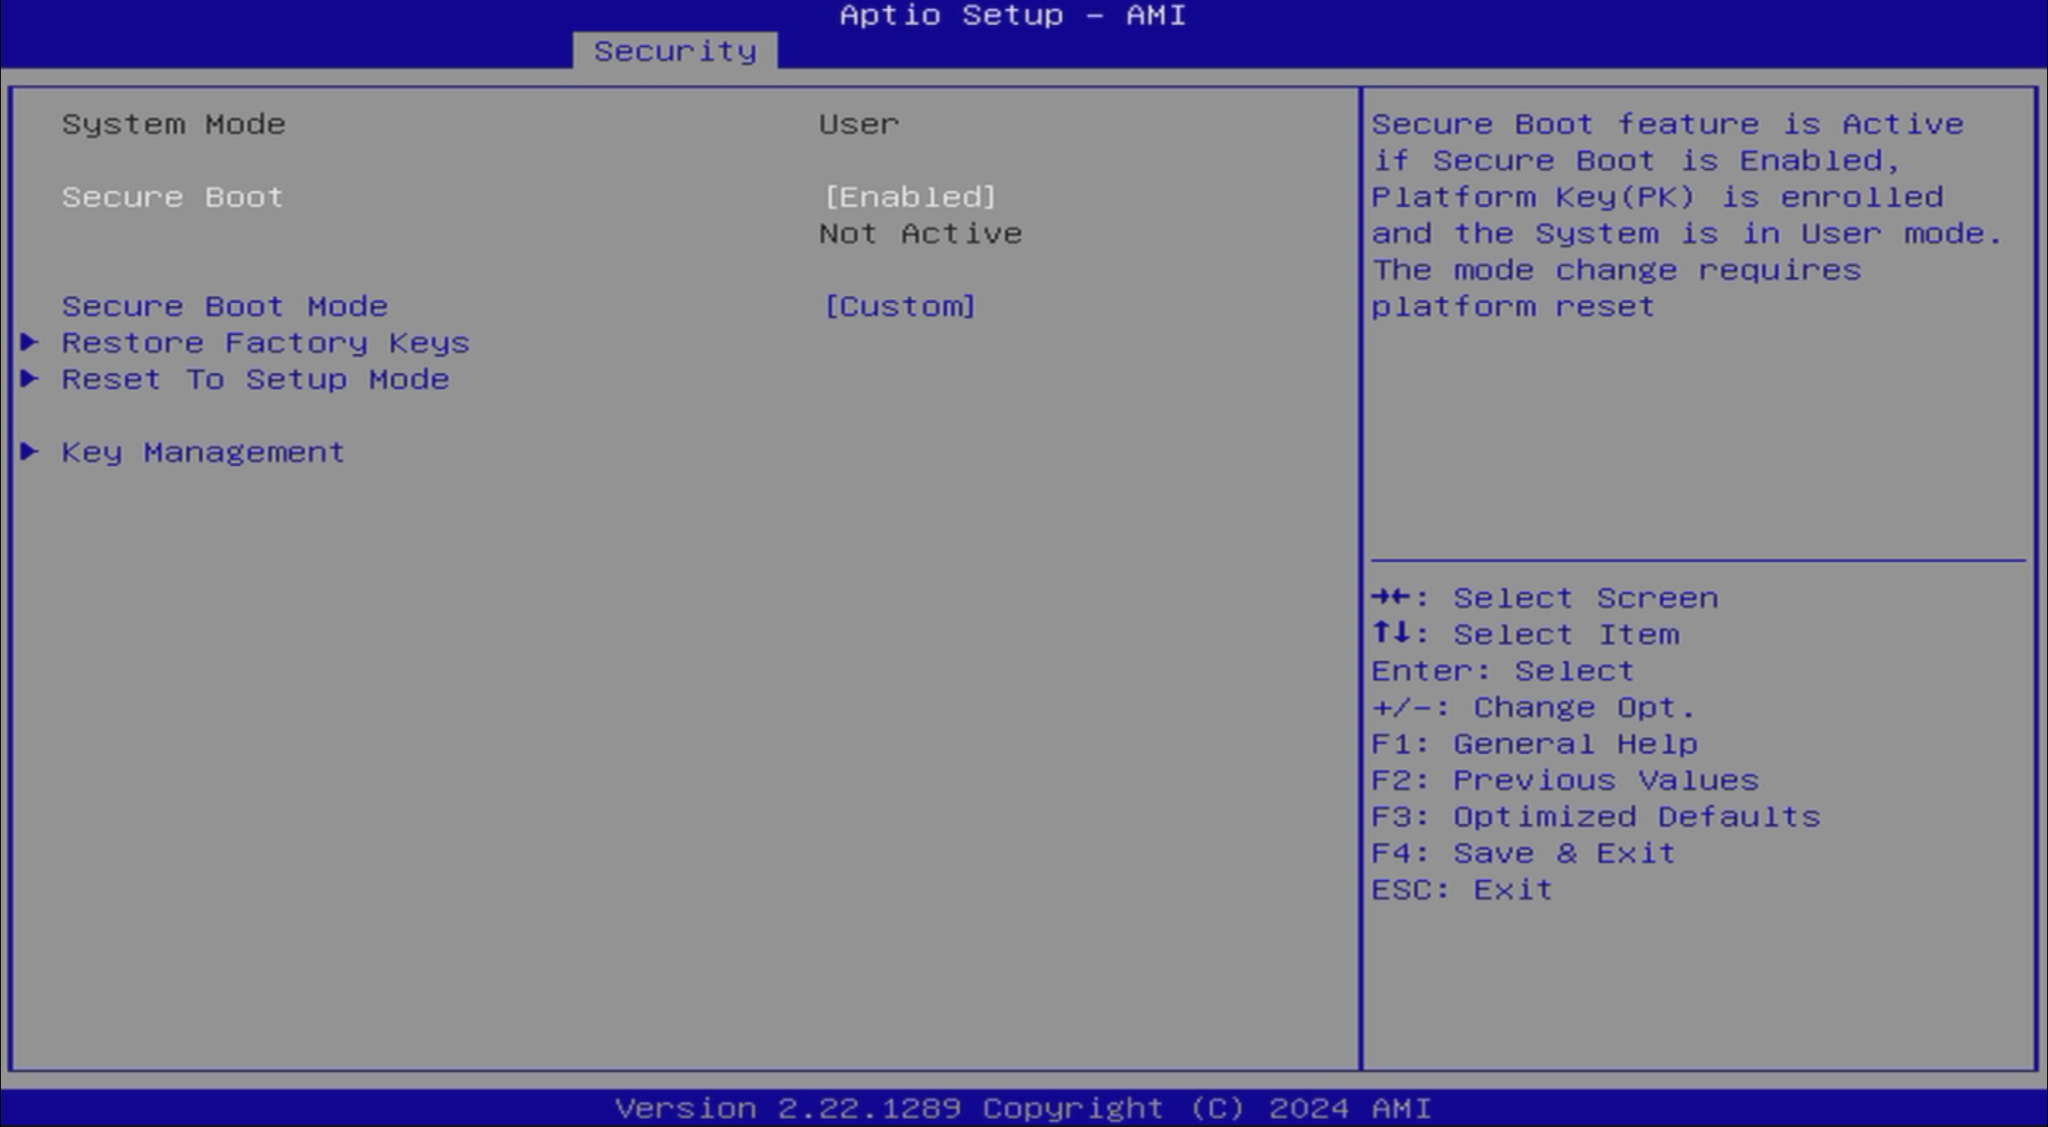
After key enrolment: set Secure Boot to Enabled, then save and restart.
Activate your licence.
Enter your License ID.
After startup, NeoStor verifies the Secure Boot configuration and displays the License ID prompt. Read the licence agreement linked on the activation screen before proceeding.
Enter the licence serial number you received by email exactly as supplied, using uppercase letters and all hyphens, then confirm with Enter.
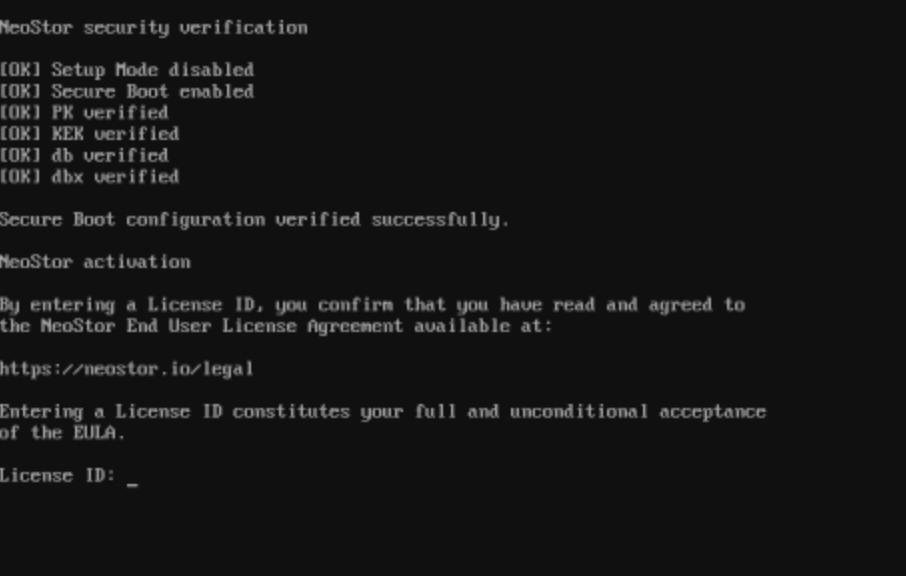
After Secure Boot verification, enter your licence serial number at the License ID prompt. Keep the Ethernet connection and Internet access available during activation.
Wait for the restart.
After successful activation, NeoStor restarts. It then asks for a hostname and displays the IP address assigned by DHCP. Make a note of this address.
Set the hostname.
Enter the hostname you want to use, or keep the default
neostor, and confirm. NeoStor is now ready for you to open its control panel.
Your first sign-in.
Open the server in your browser.
On a computer on the same network, enter the server IP address shown on the NeoStor screen into your web browser.
Sign in to the control panel.
Use the default credentials:
- Username
admin- Password
admin
Change the default password after signing in.
Your NeoStor server is activated and the control panel is available on your local network.
For workstation access, use your existing SMB / Avid NEXIS® clients*. Any Avid® client software must be lawfully obtained; NeoStor does not supply it or advise where to obtain it.
Getting Started.
Create your first shared workspace. Once NeoStor is installed and activated, configure your storage pool, create a workspace, and give your users access.
Check your disks.
Open Disks and identify the drives you want to use for storage. Check their model, capacity and health.
The disk contains data message means NeoStor detected existing content on that disk. Back up anything you need before using it to create a new pool.
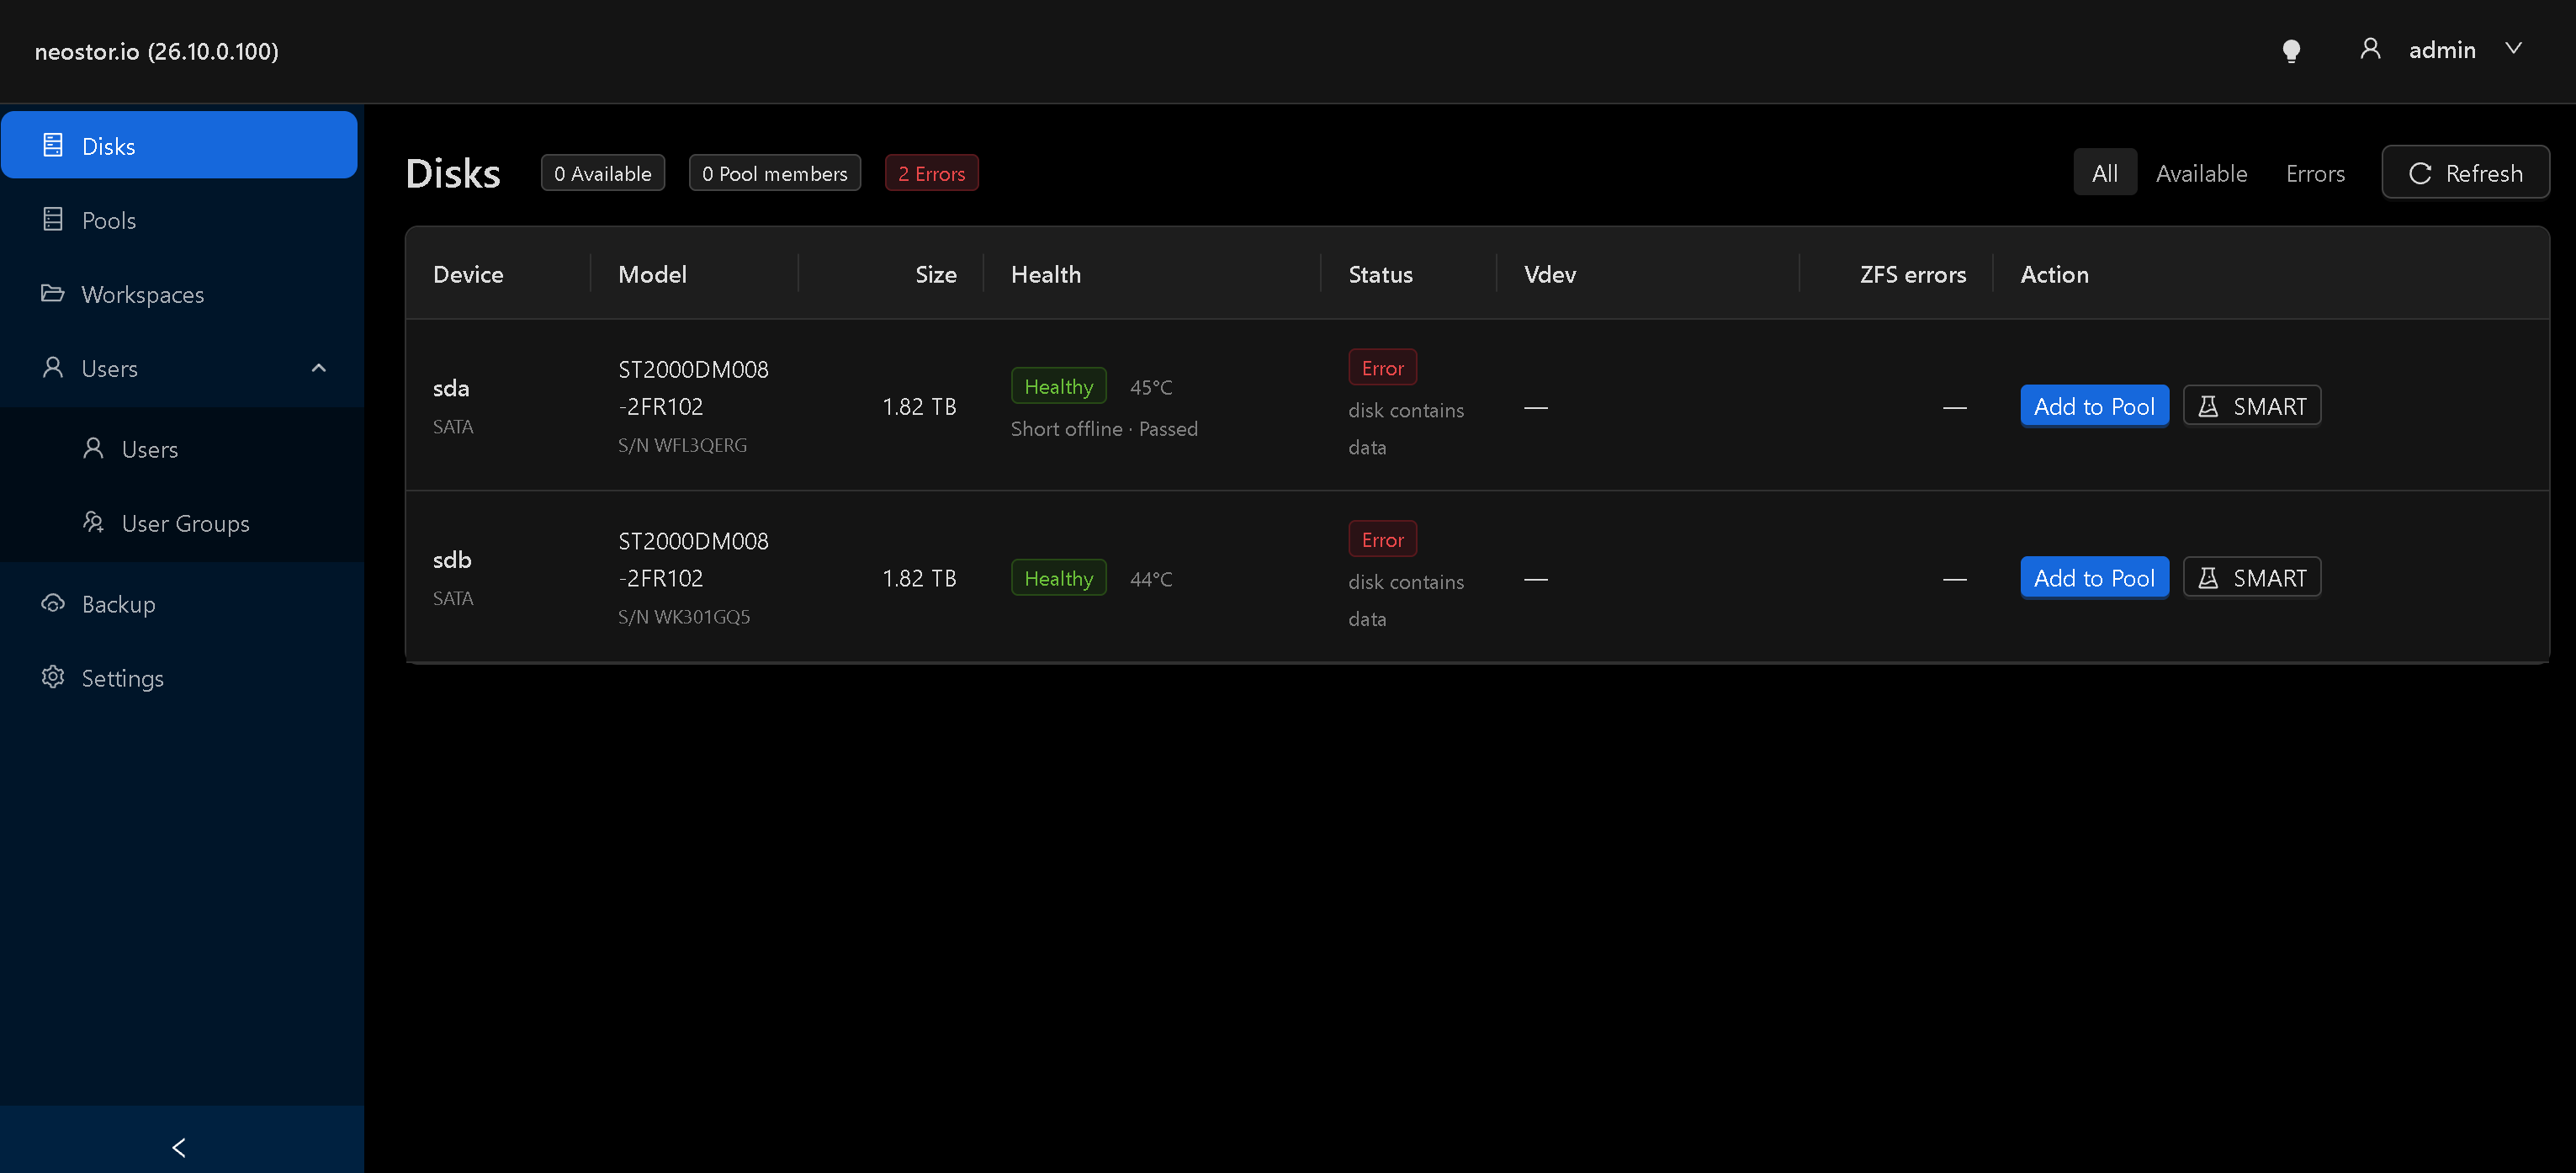
Disks: check the drives and their health. These example disks contain existing data. Create a ZFS storage pool.
Open Pools and click New pool.
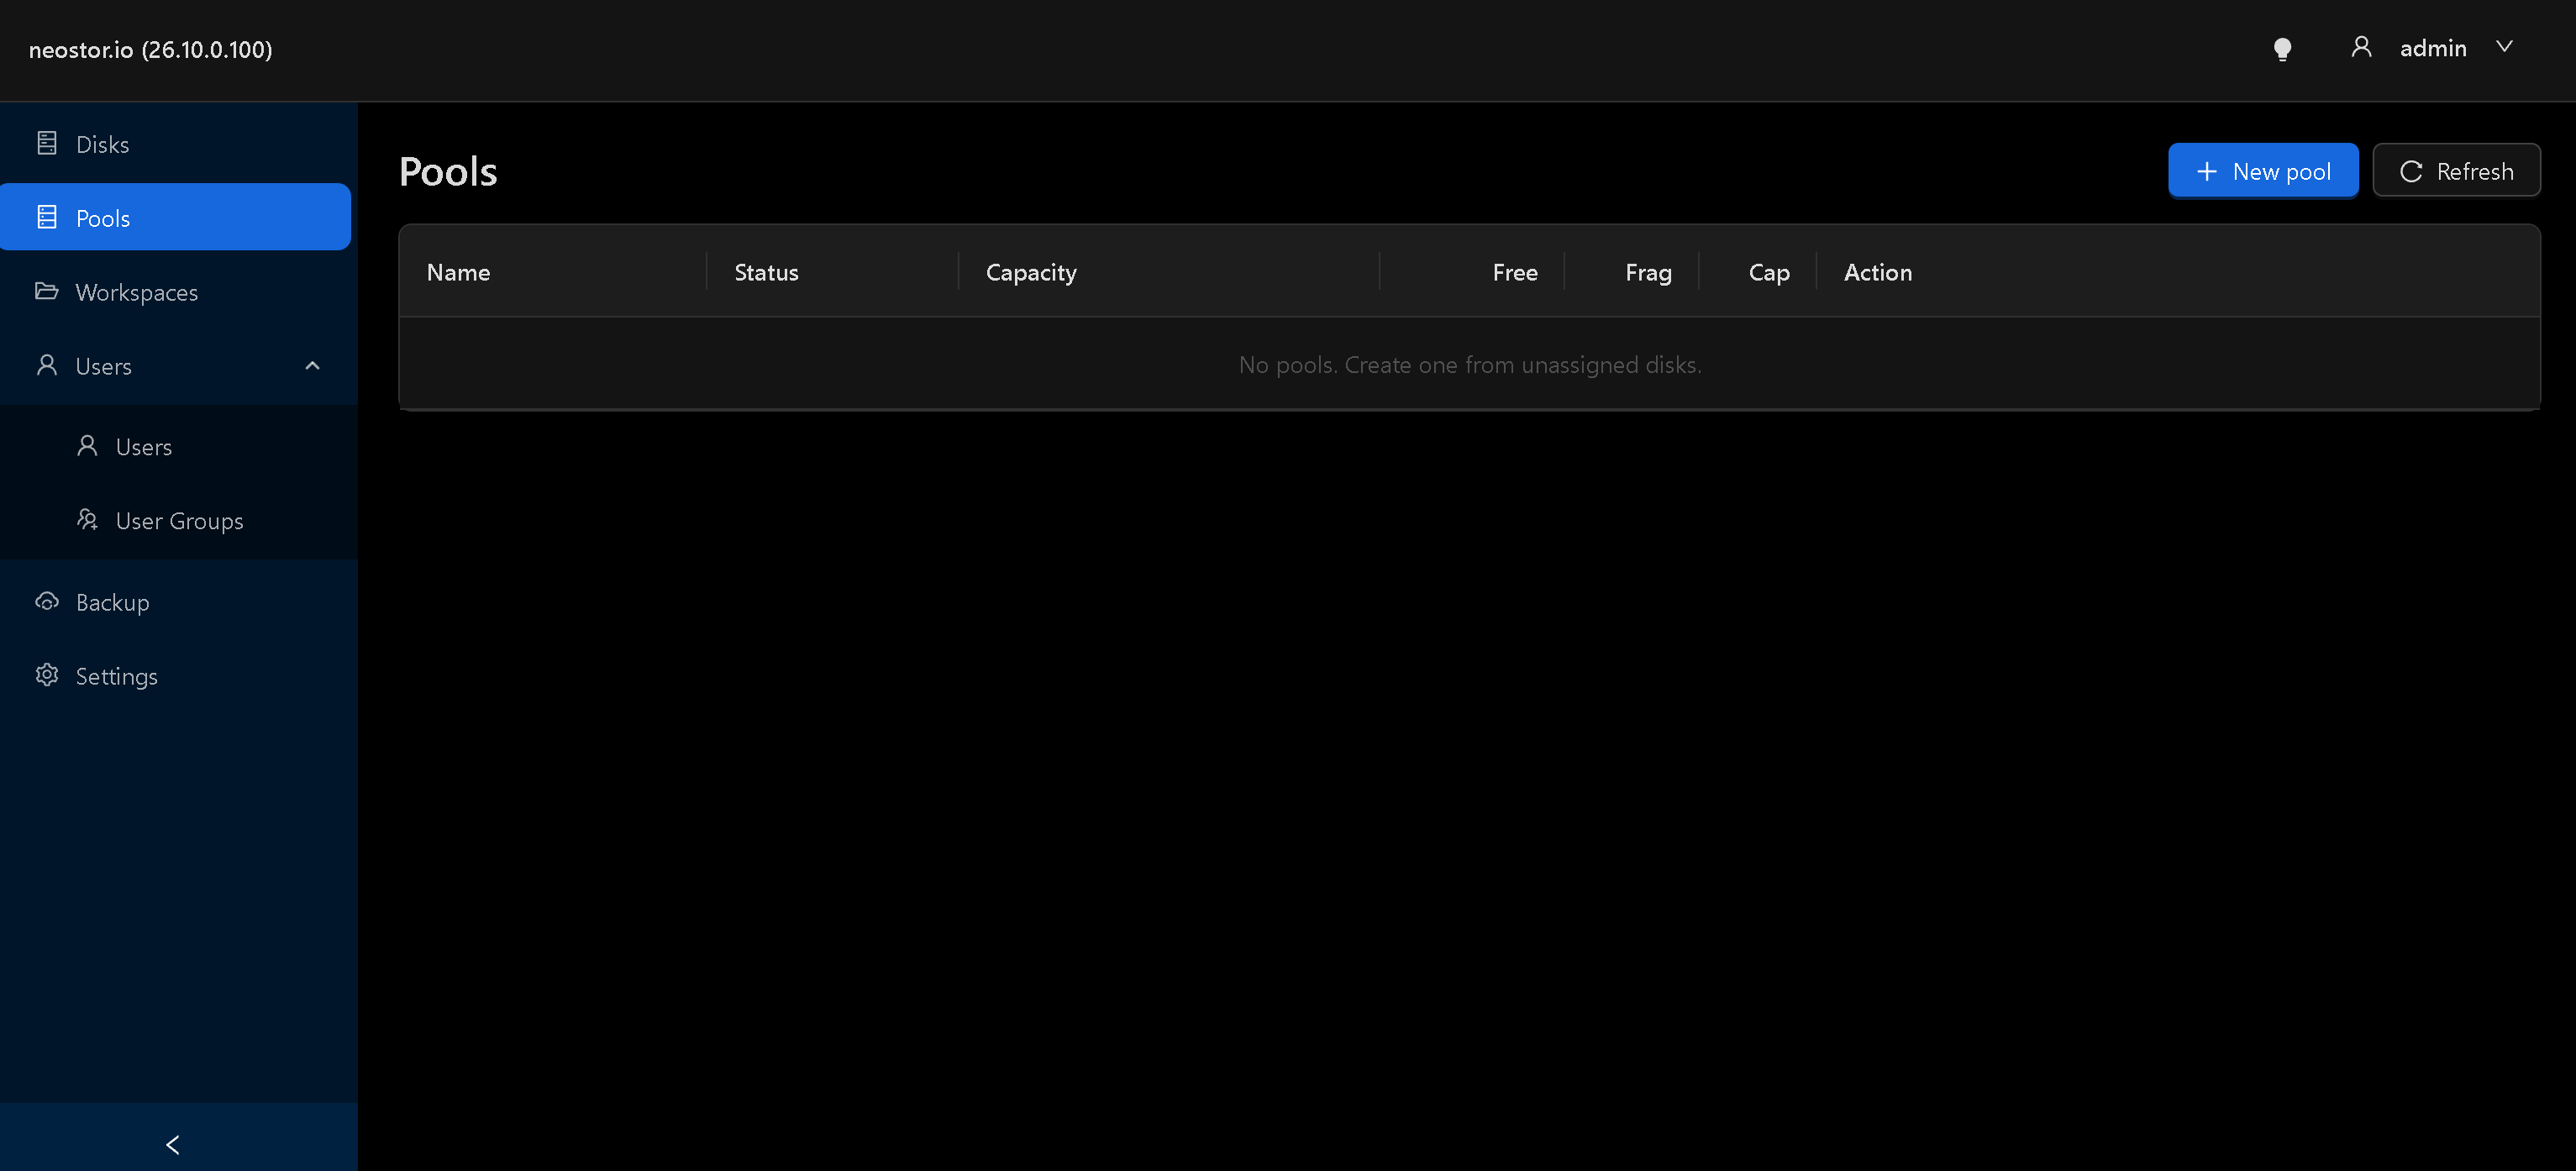
Pools: click New pool to configure your storage. Enter a pool name, such as
neostor, select a layout, and choose the disks to include. In this example, we use two disks with the mirror layout, which stores a copy of the data on each disk and allows the pool to continue operating if one disk fails.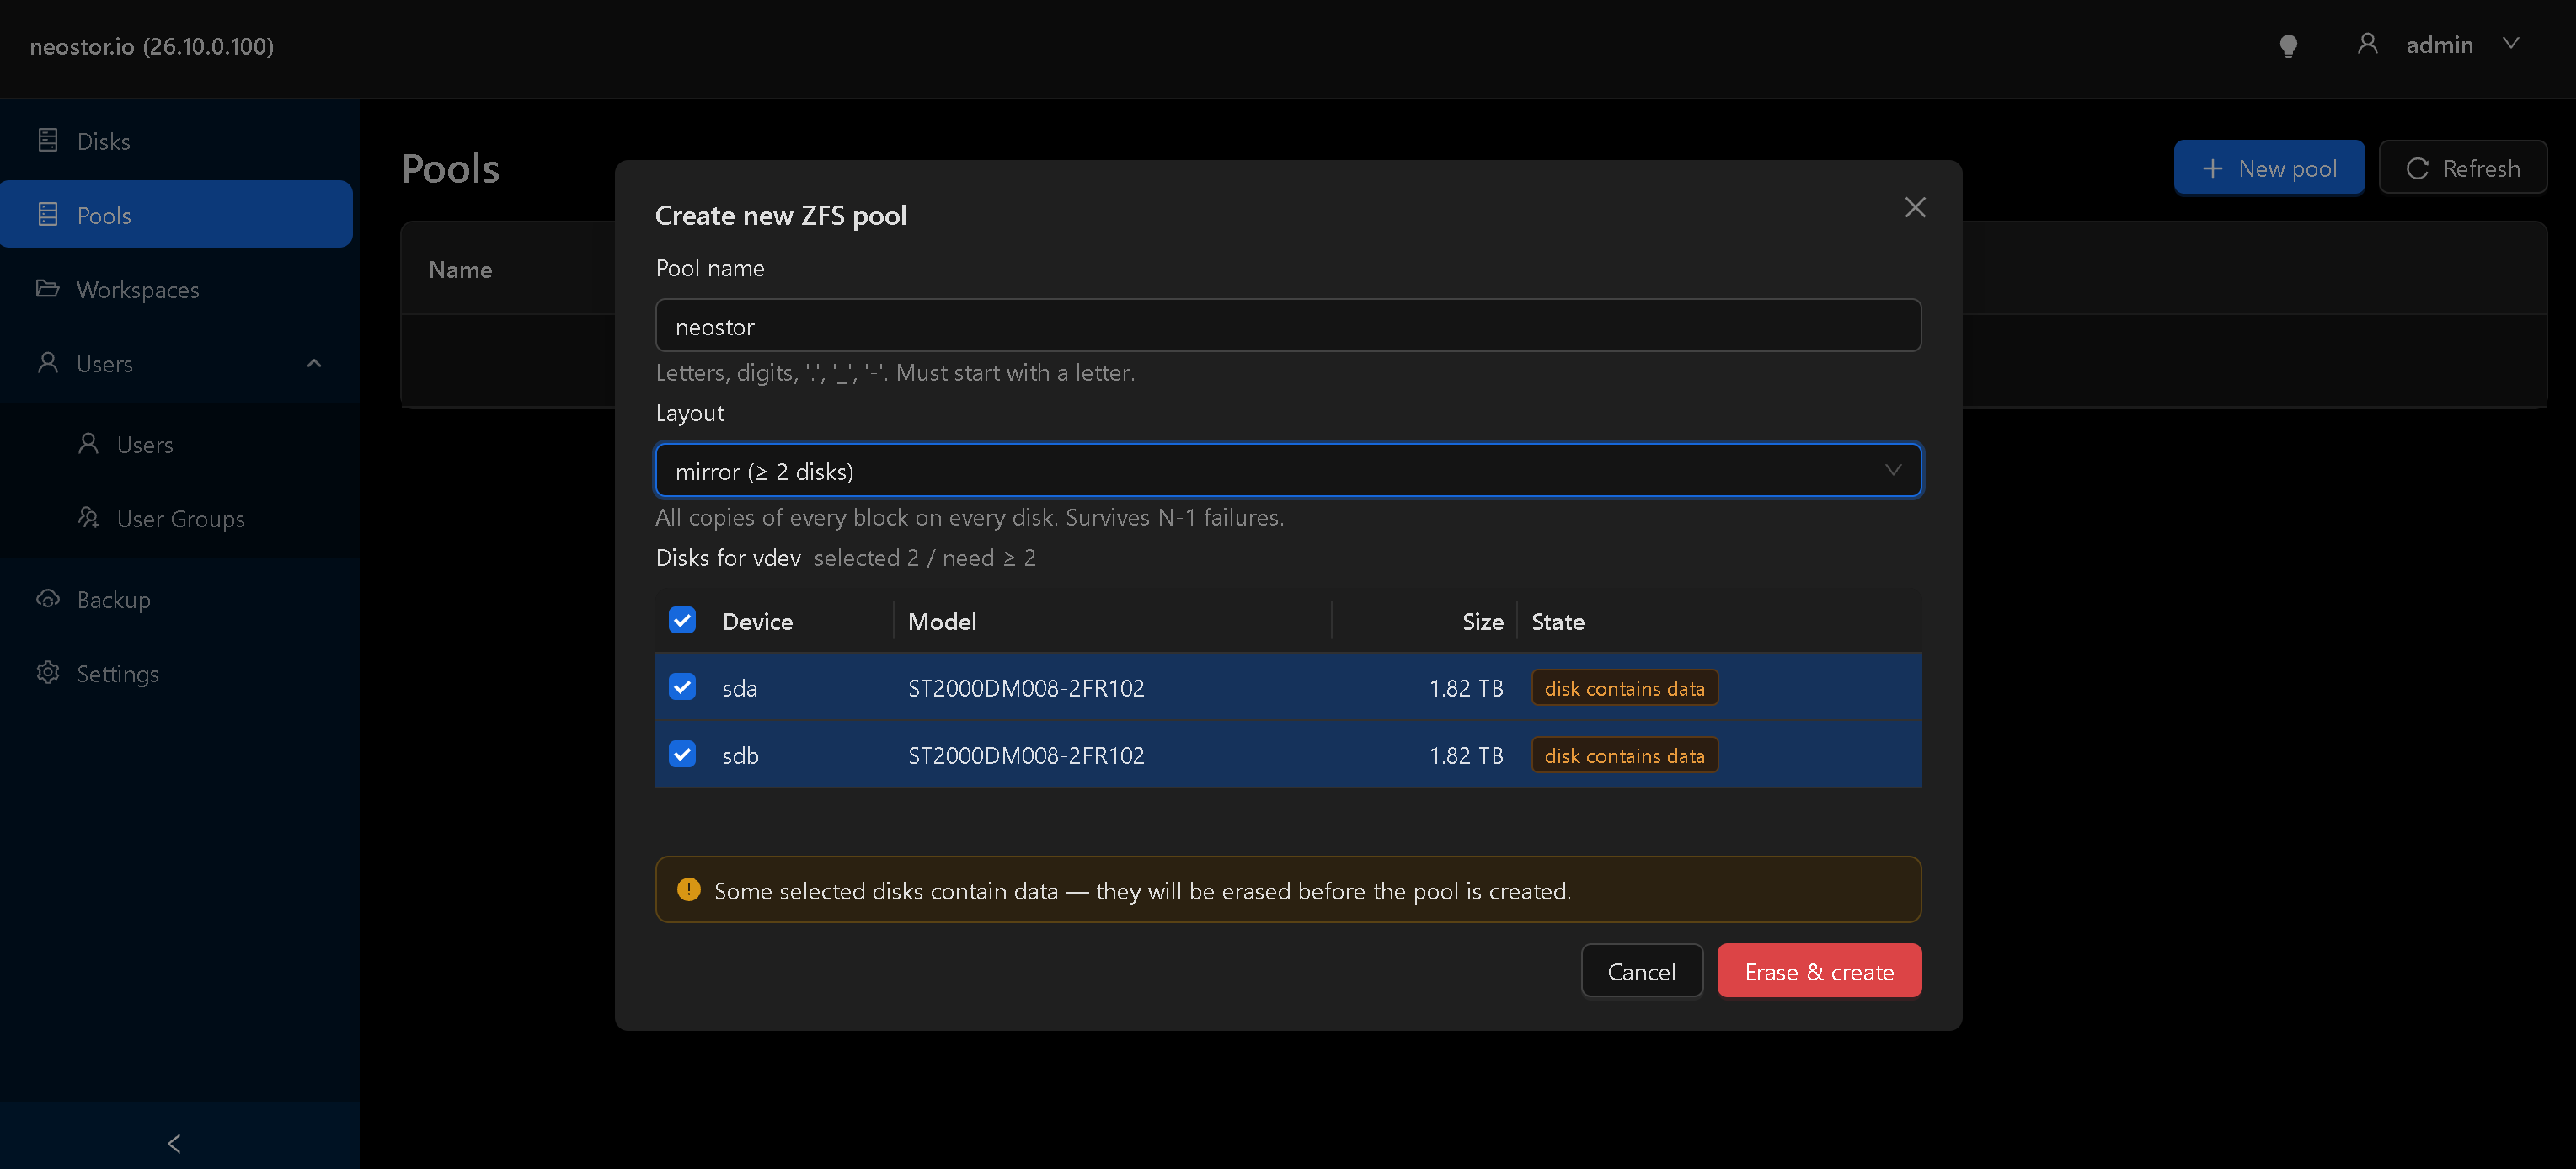
Example: pool neostor, two disks, mirror layout. Erase & create removes existing data from the selected disks. Check that the pool is online.
After creation, your pool appears on the Pools page. Verify that its status is ONLINE.
The available capacity depends on your disks and the selected storage layout. The capacities shown in this guide are examples.
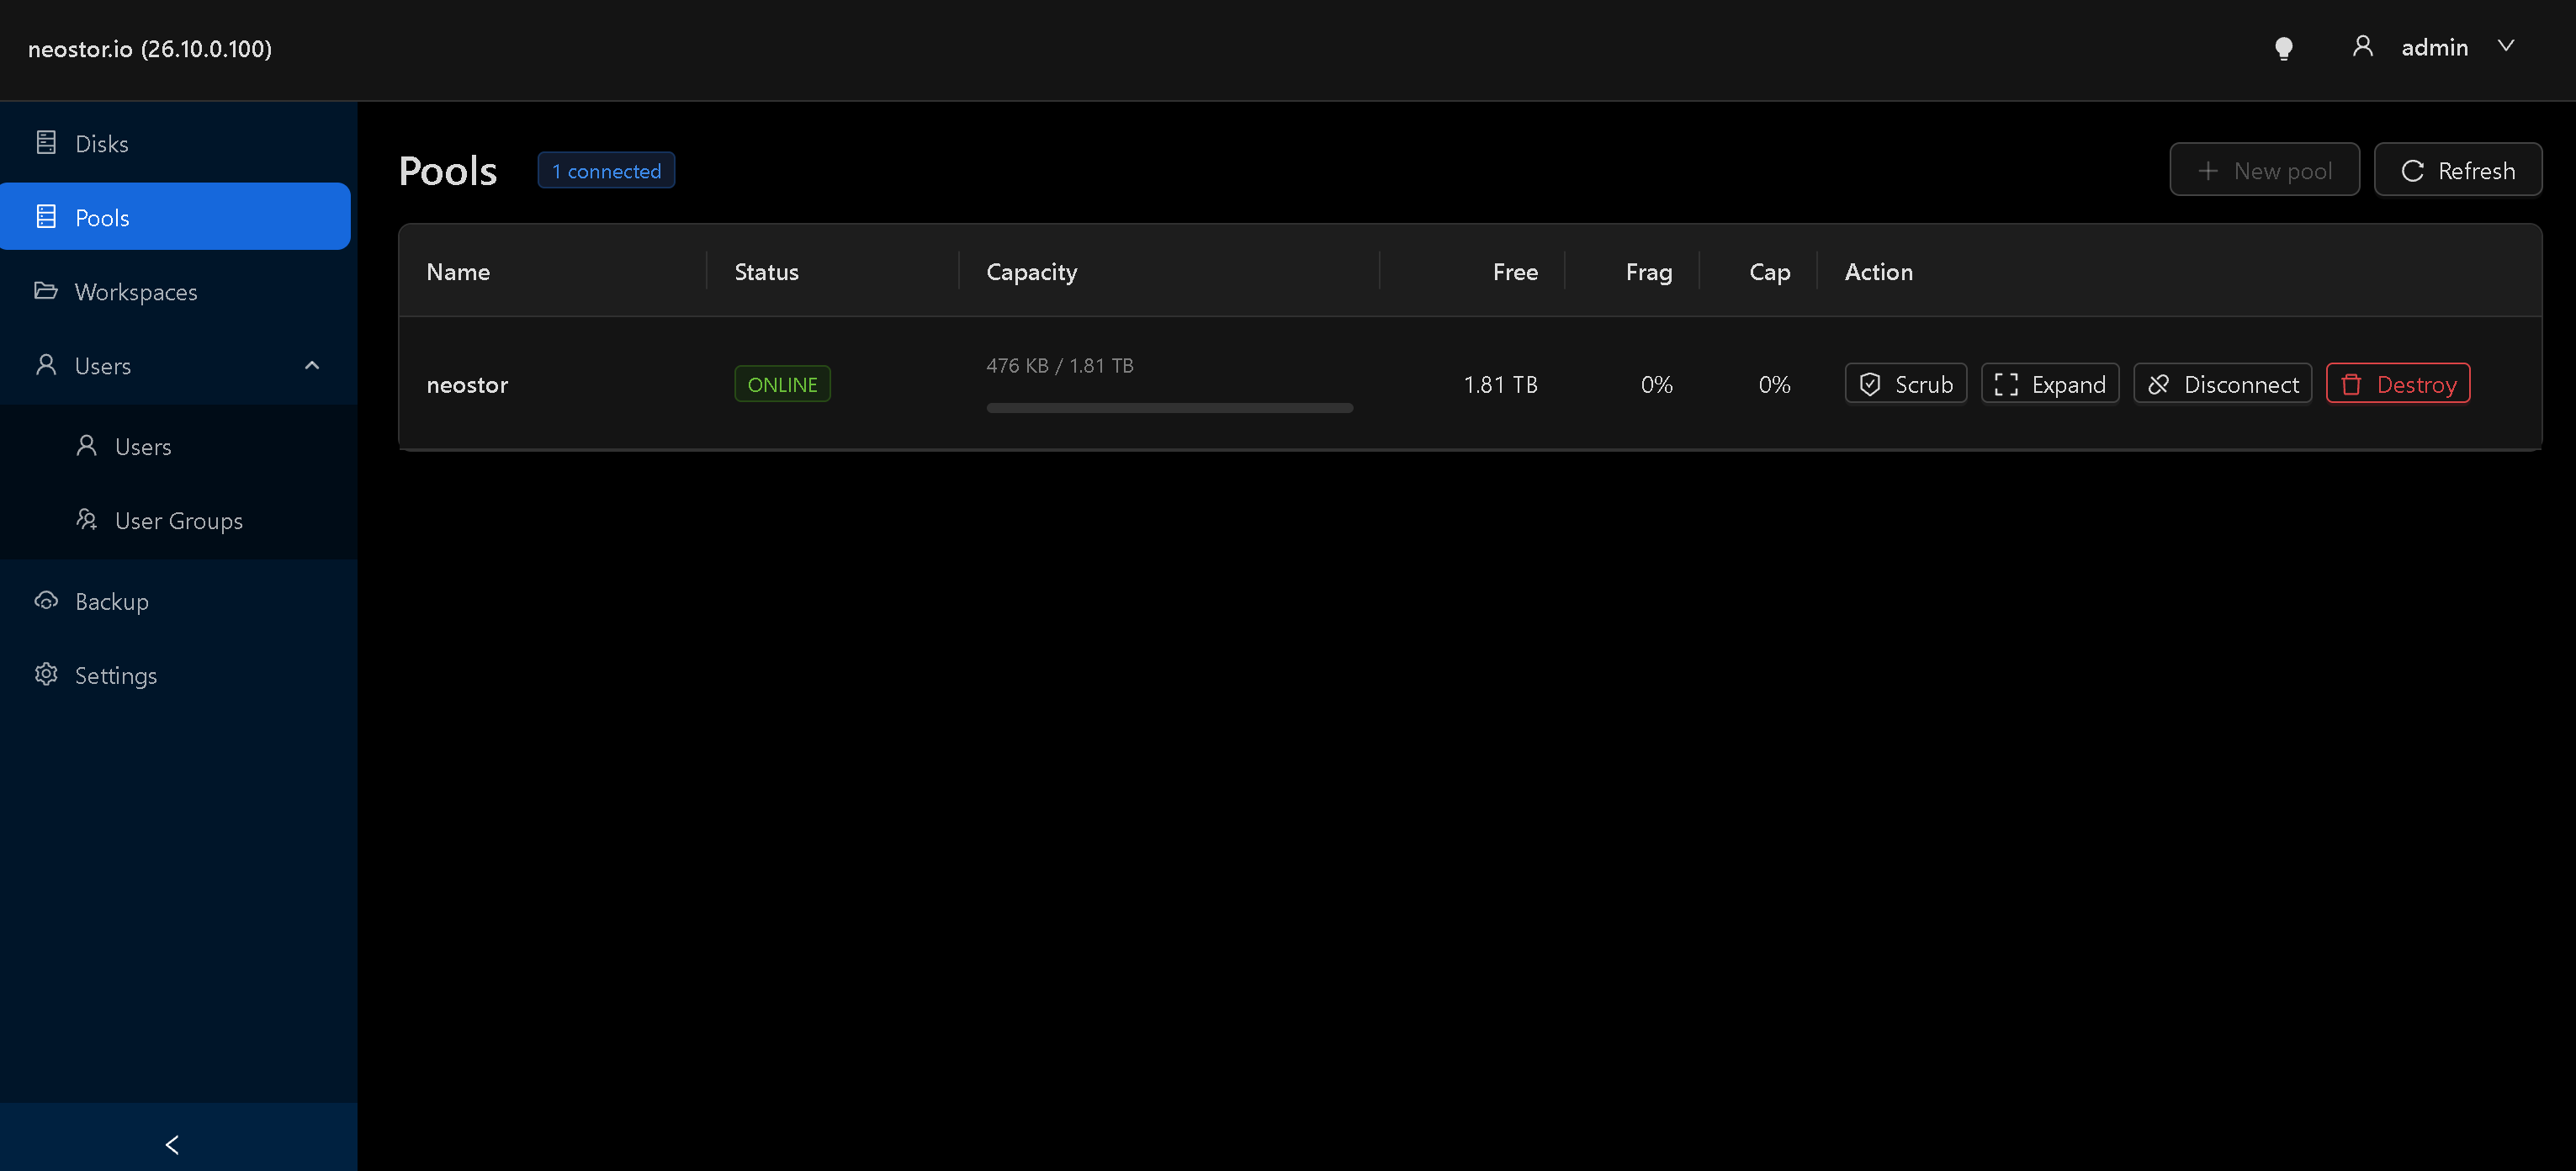
The new neostor pool is ONLINE. Capacity varies with the disks and storage layout. Create your first workspace.
Open Workspaces and click New workspace.
On the General tab, enter a name such as
media, select theneostorpool, and set the workspace capacity. This example uses 100 GiB. You can also add a description.Click Create. You can resize the workspace later, within the available pool capacity and your licence limits.
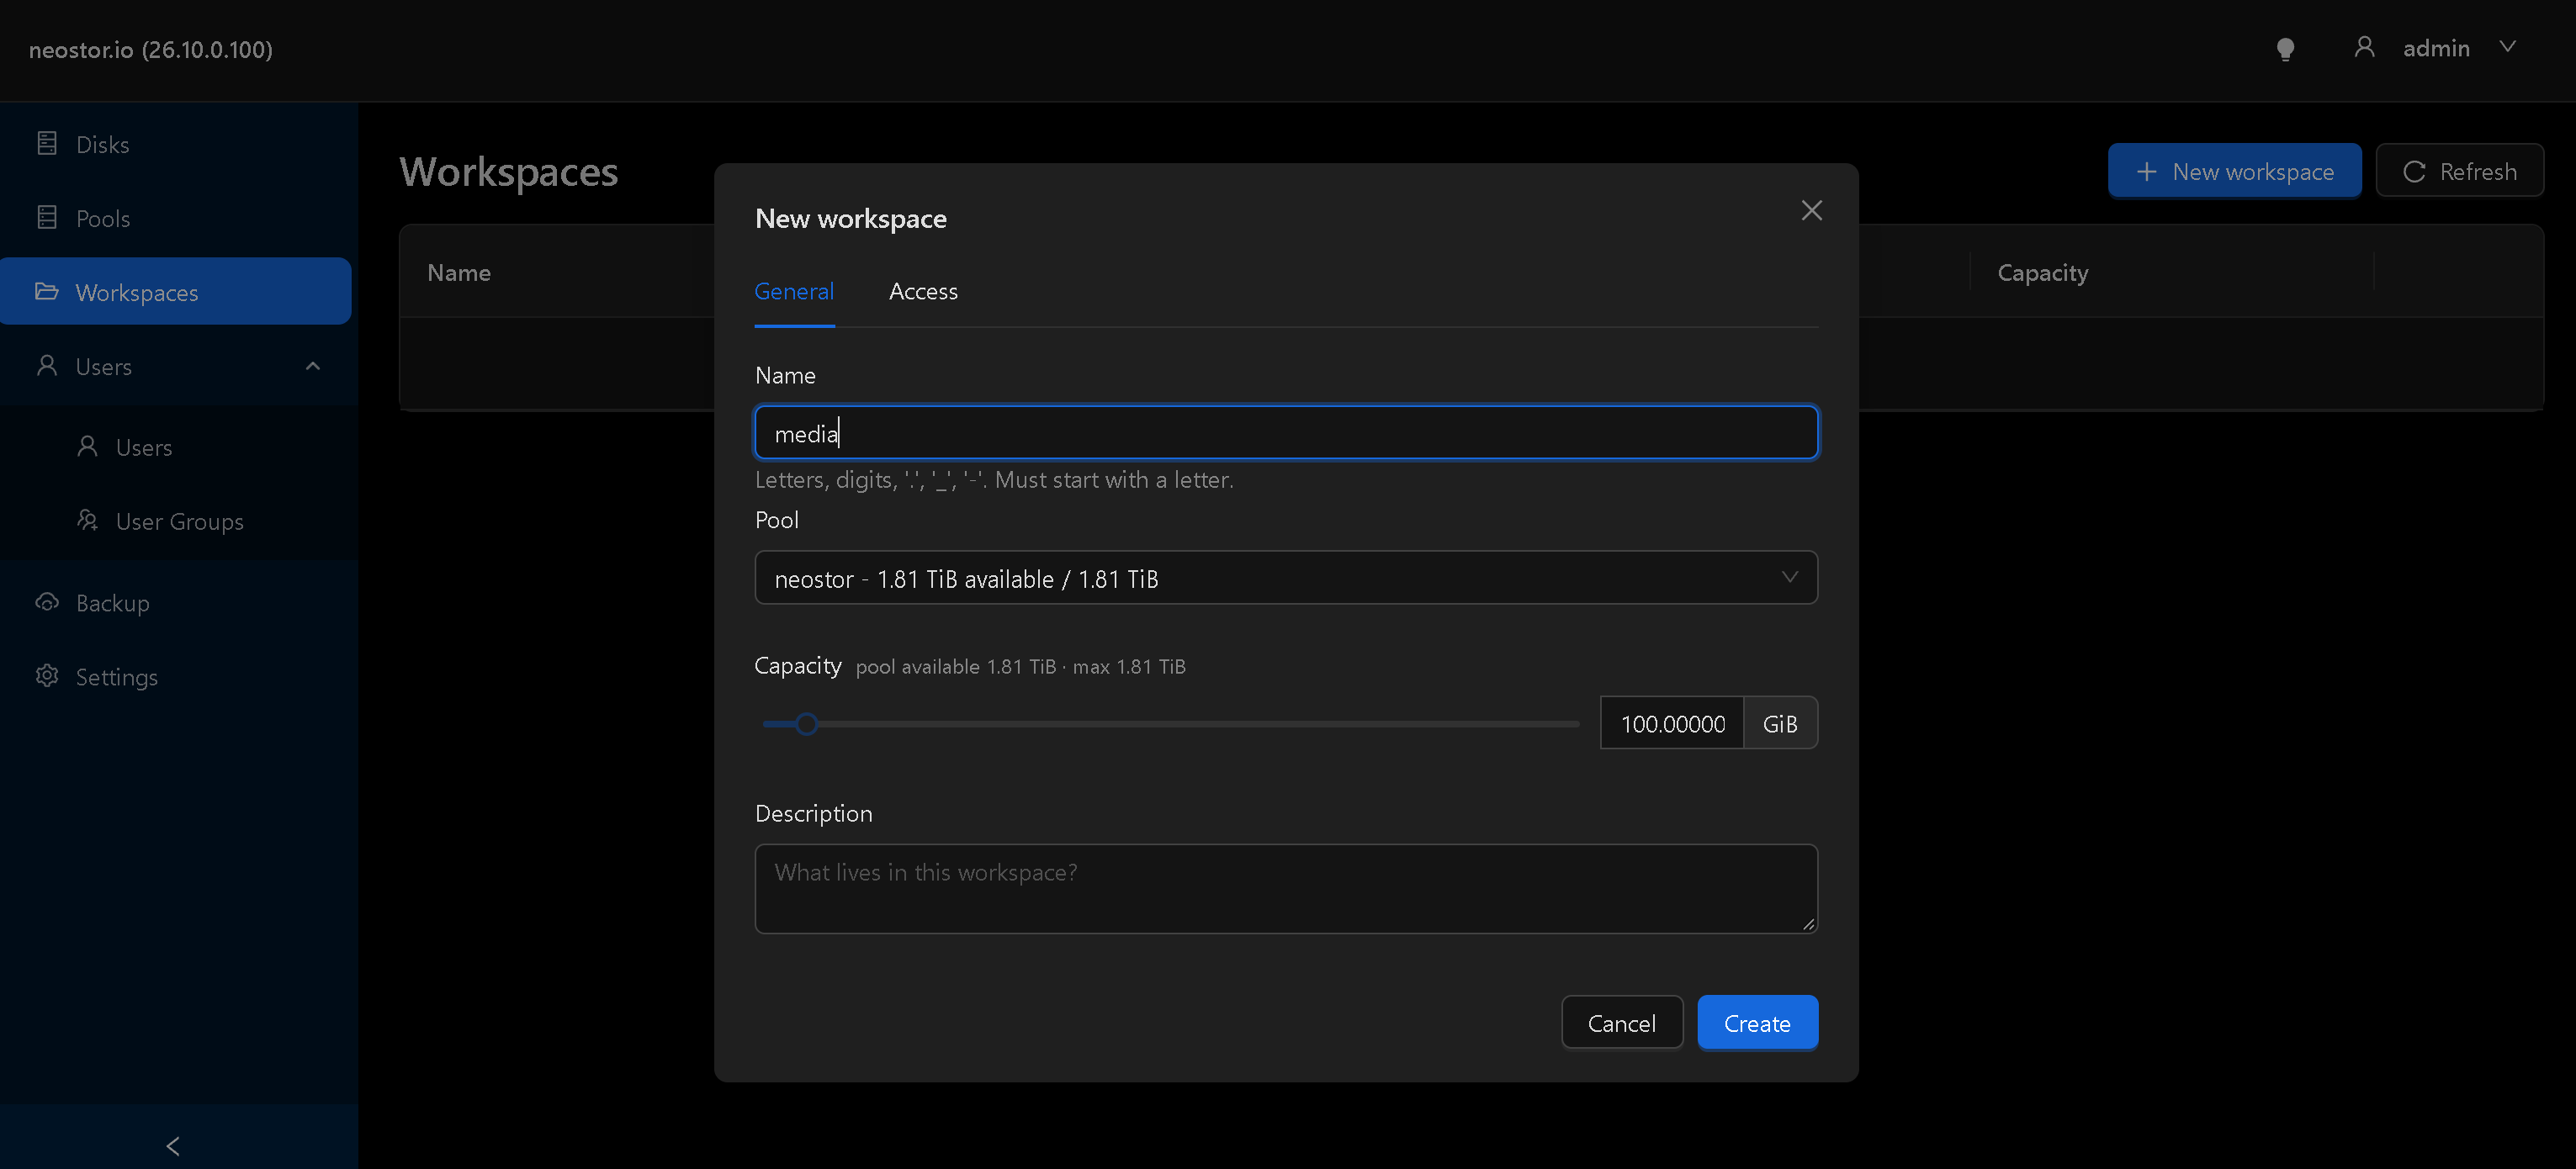
Example: workspace media on pool neostor, with a capacity of 100 GiB. Create a user account.
Open Users → Users and click New user.
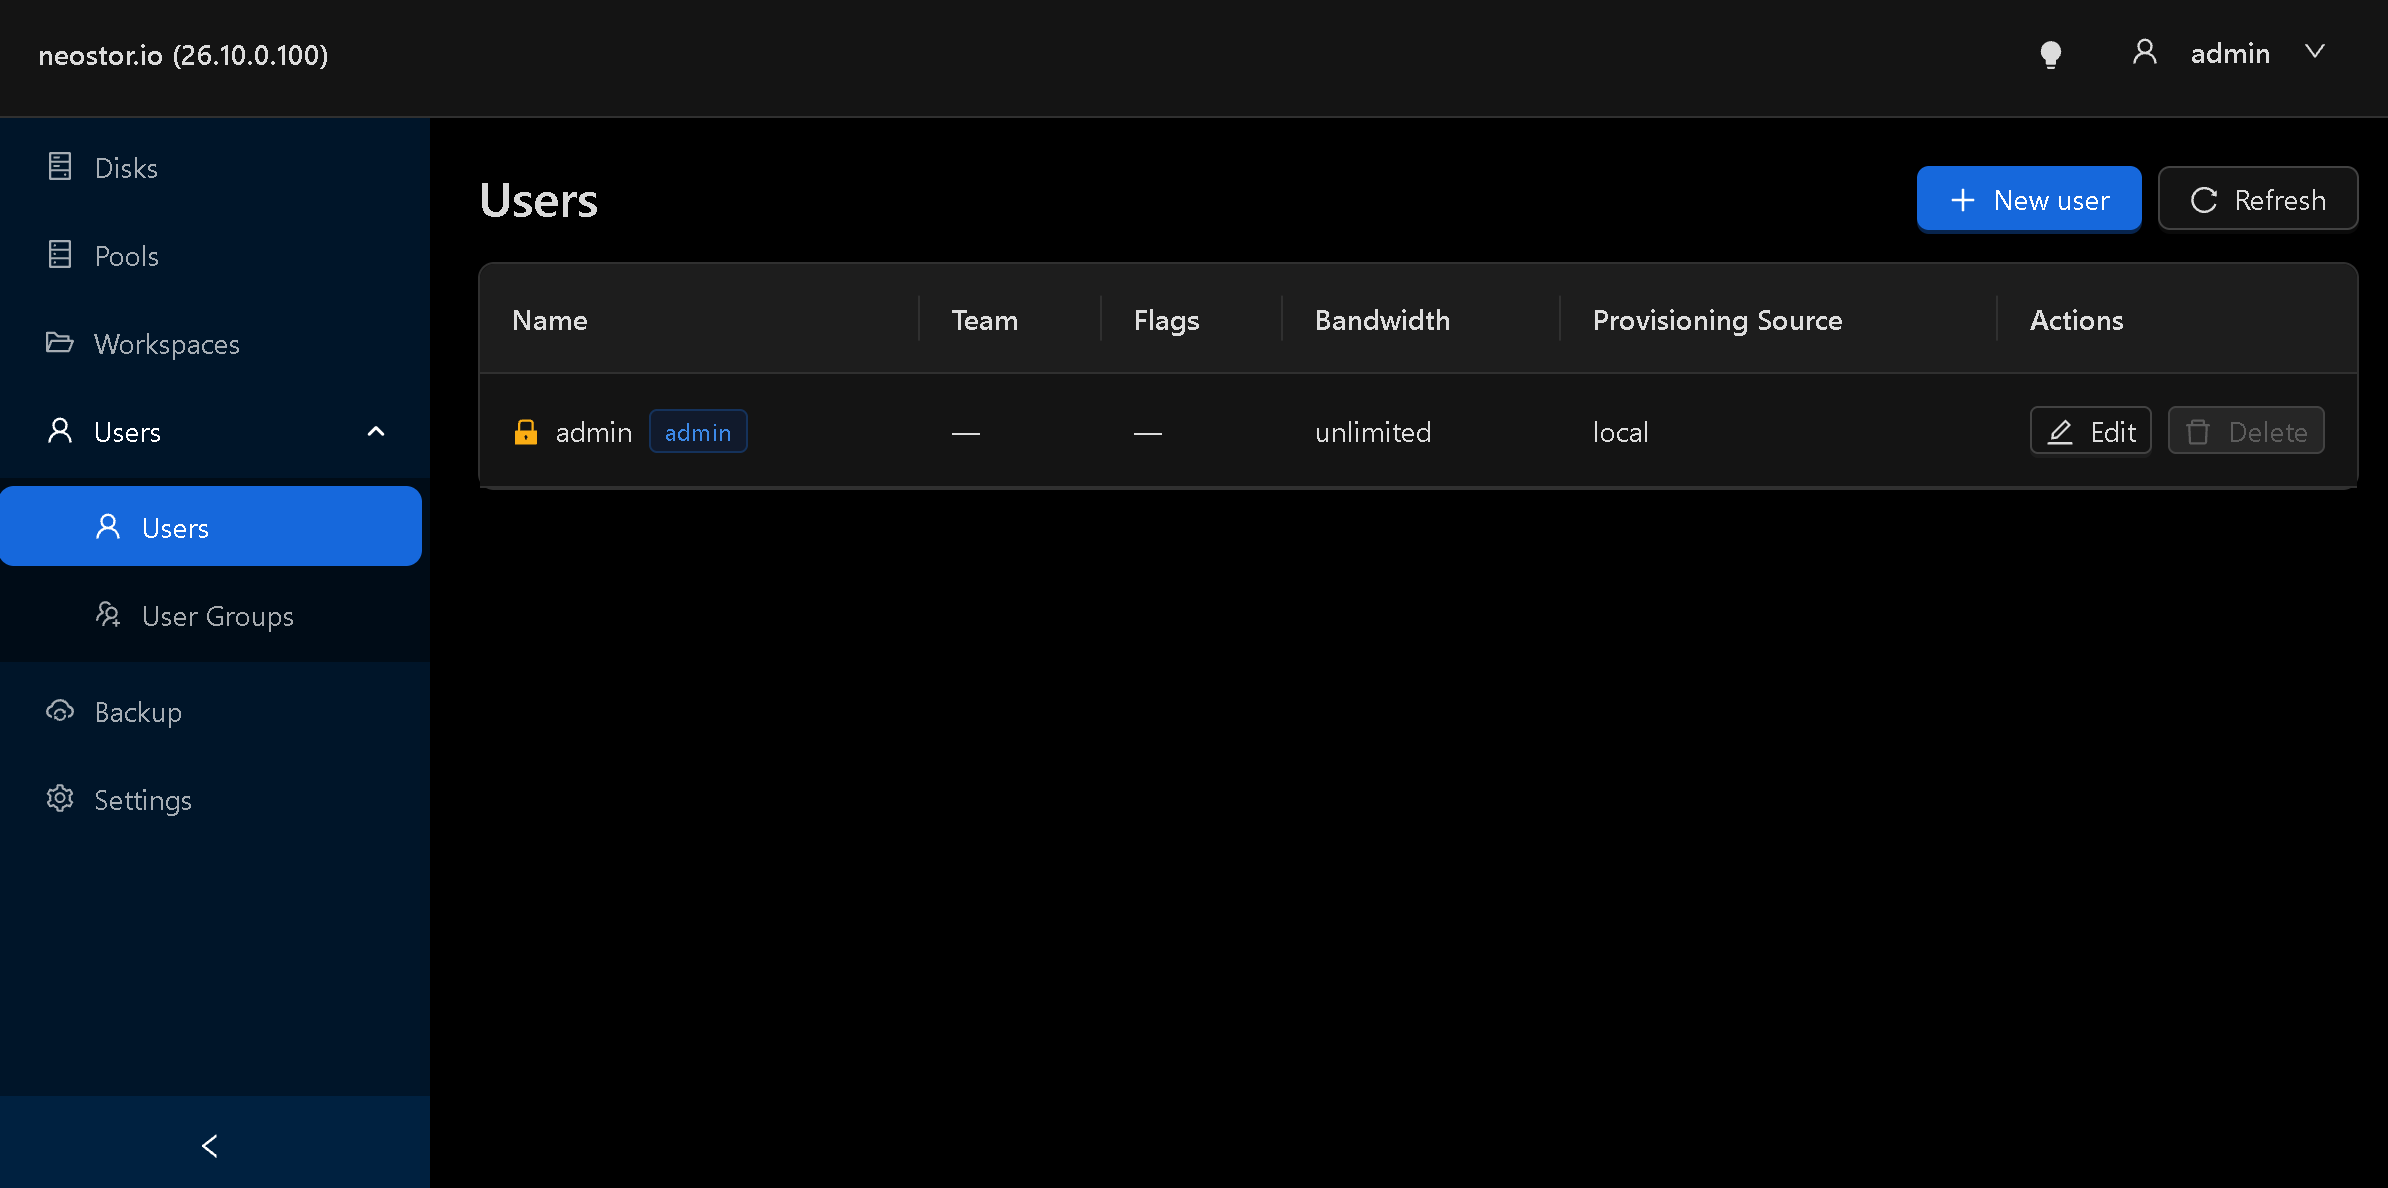
Open Users → Users, then click New user to create an account for workstation access. Enter a username, such as
mike, choose a strong password, and enter it again in Verify password. Leave Disable user unchecked, then click Create.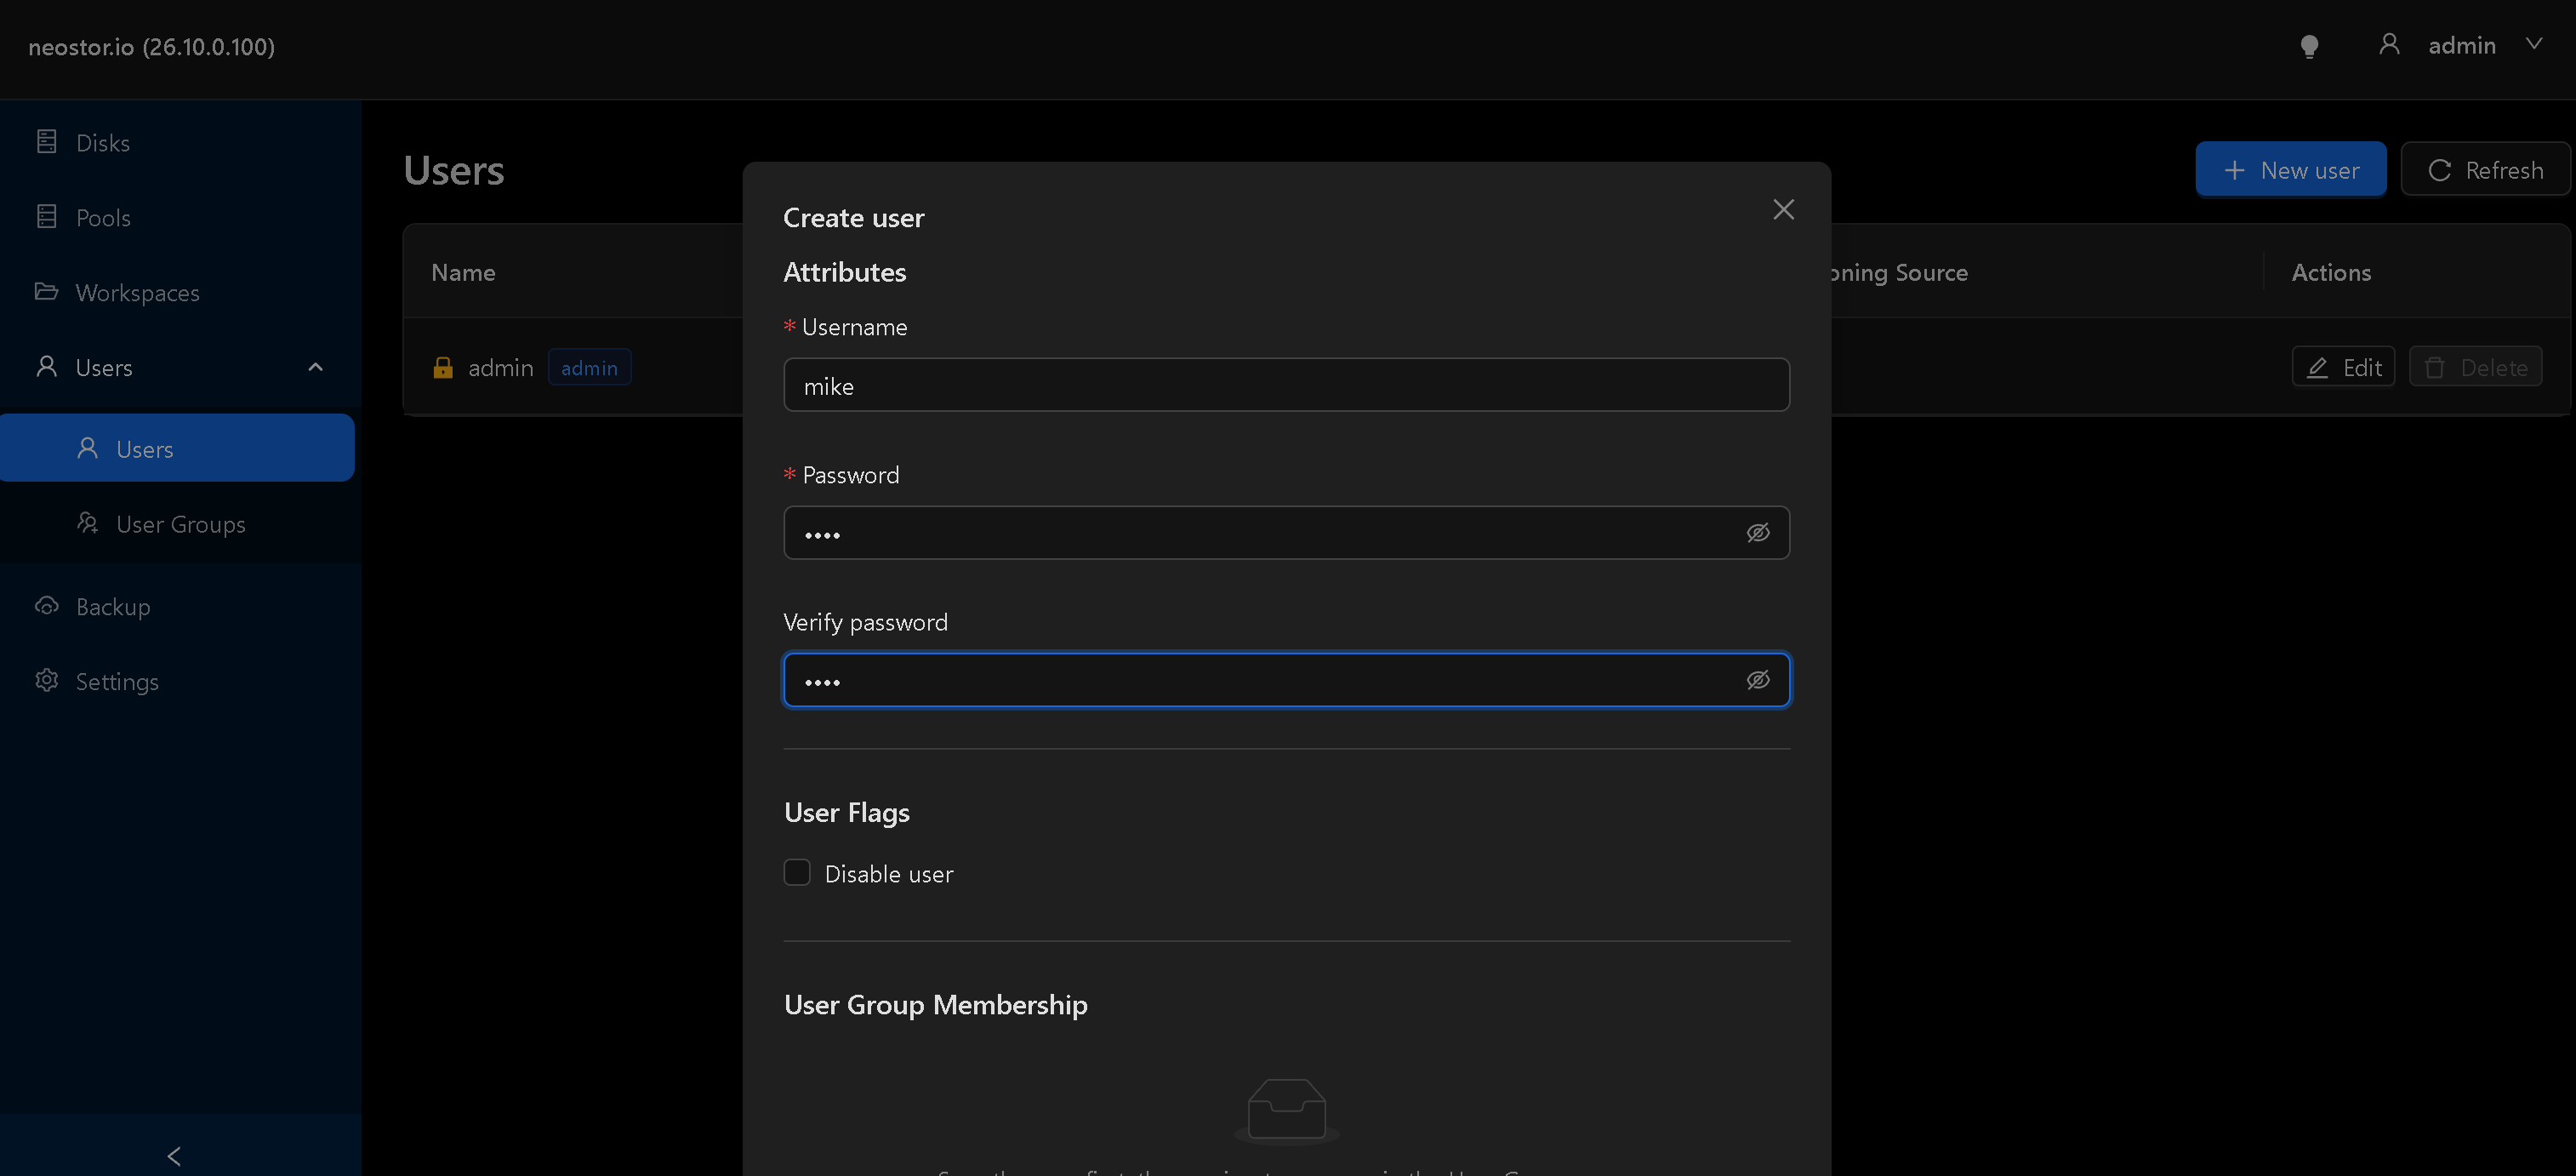
Enter the username and password, then repeat the password in Verify password. Click Create at the bottom of the dialog. The new account will appear in the users list.
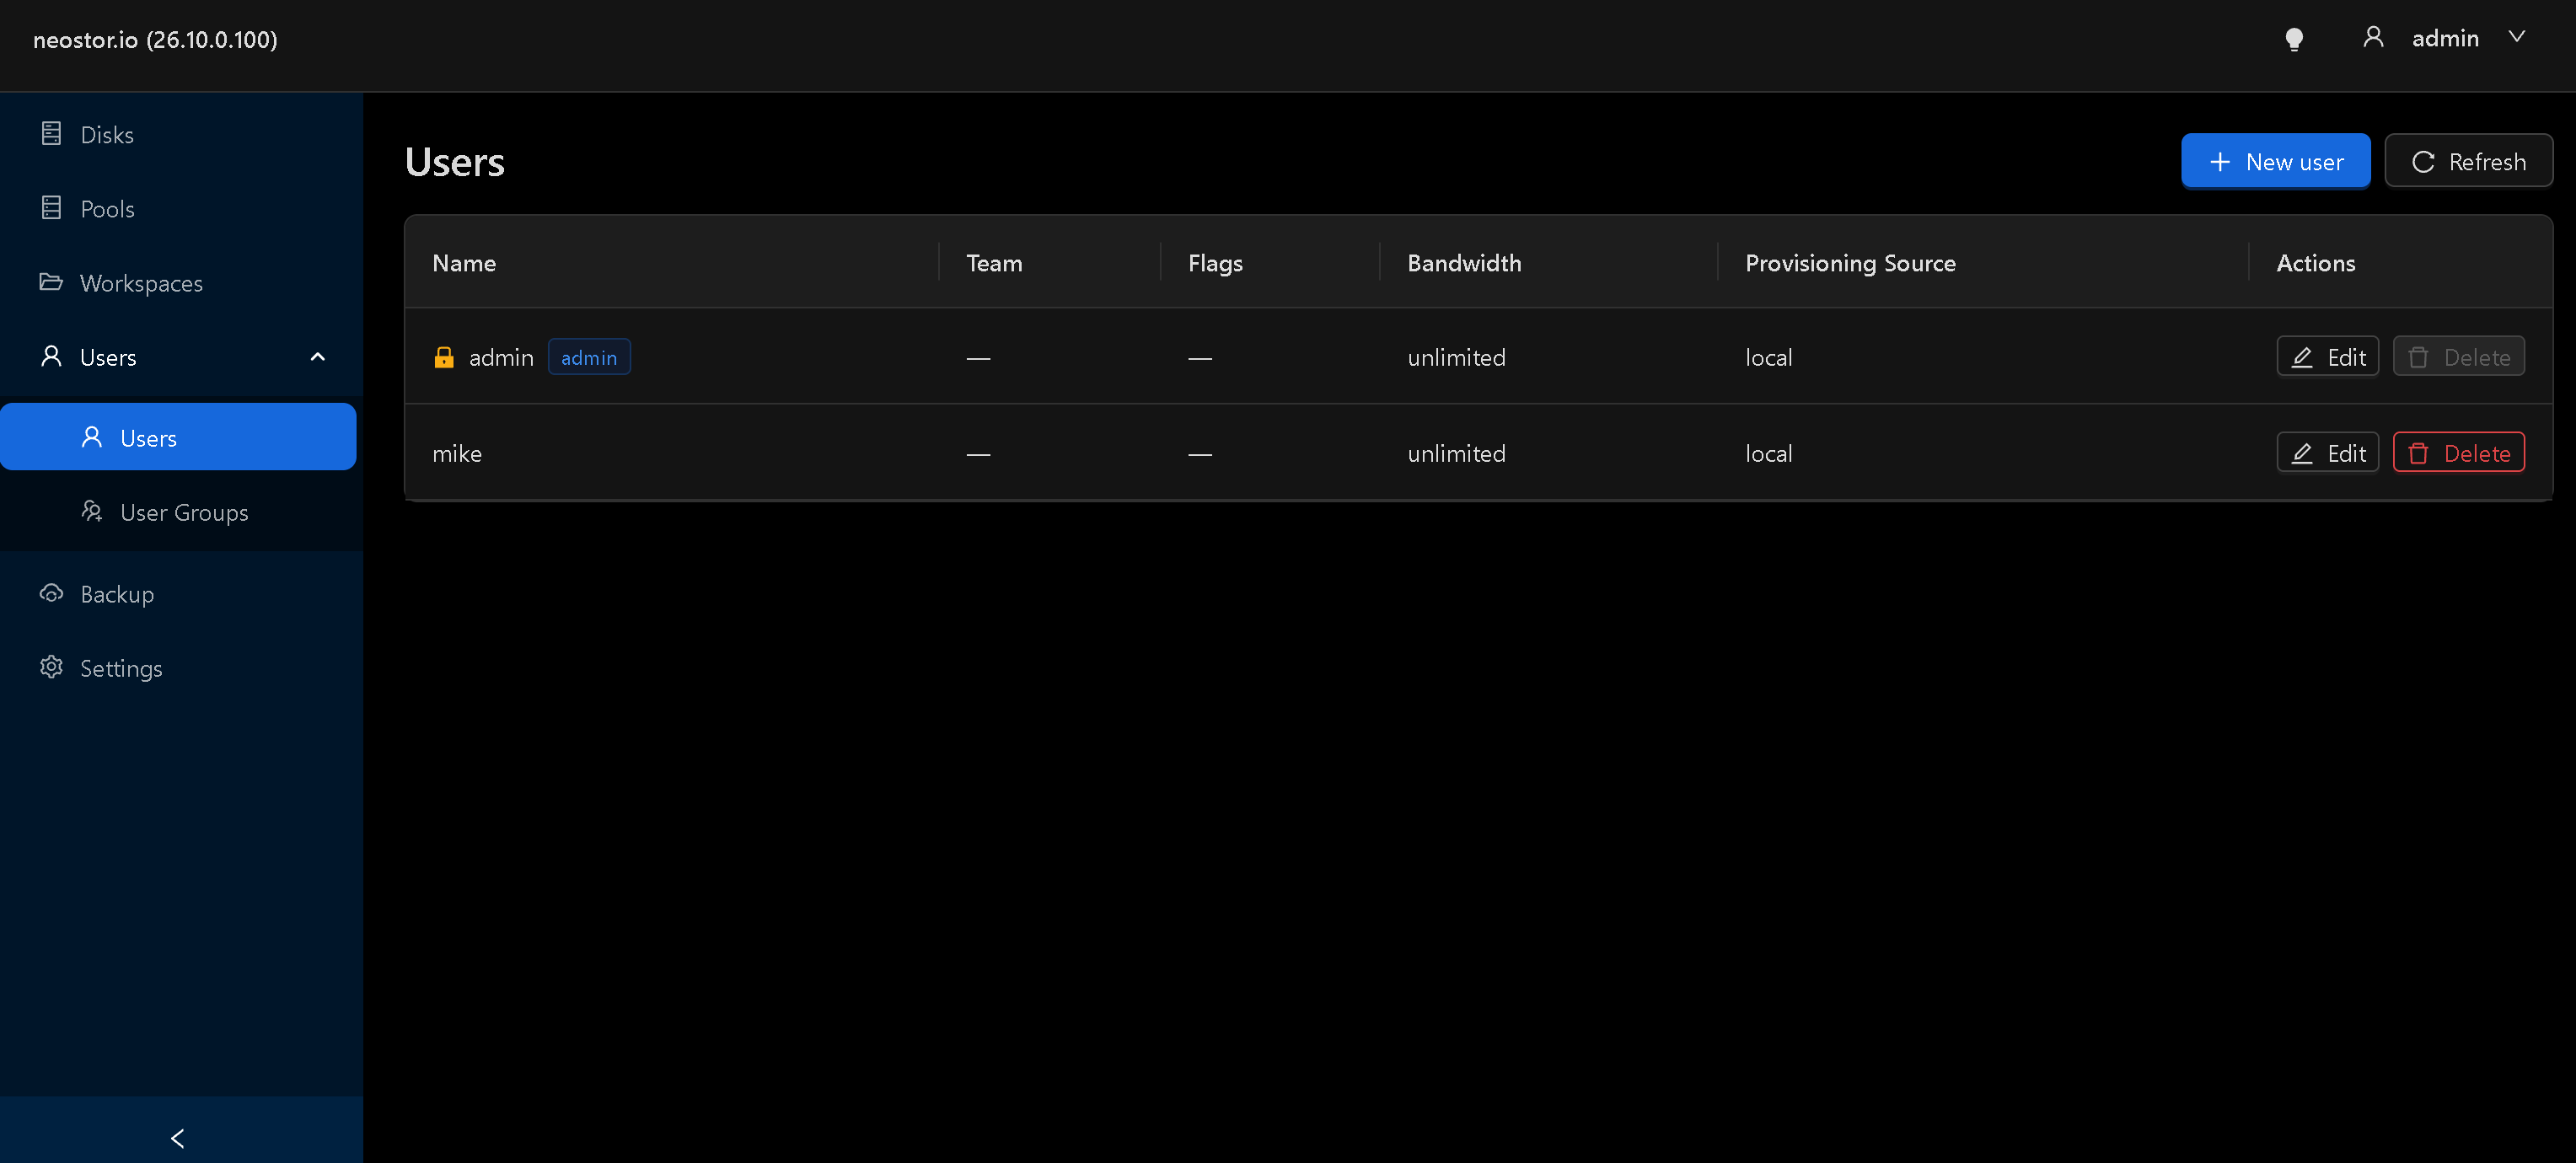
The new mike account appears in the users list. Give the user access to the workspace.
Return to Workspaces, double-click
media, and open the Access tab.Add
mikeand select the required permission:- read+write — allows reading, creating, changing and deleting files.
- read-only — allows reading files without changing them.
Click Save.
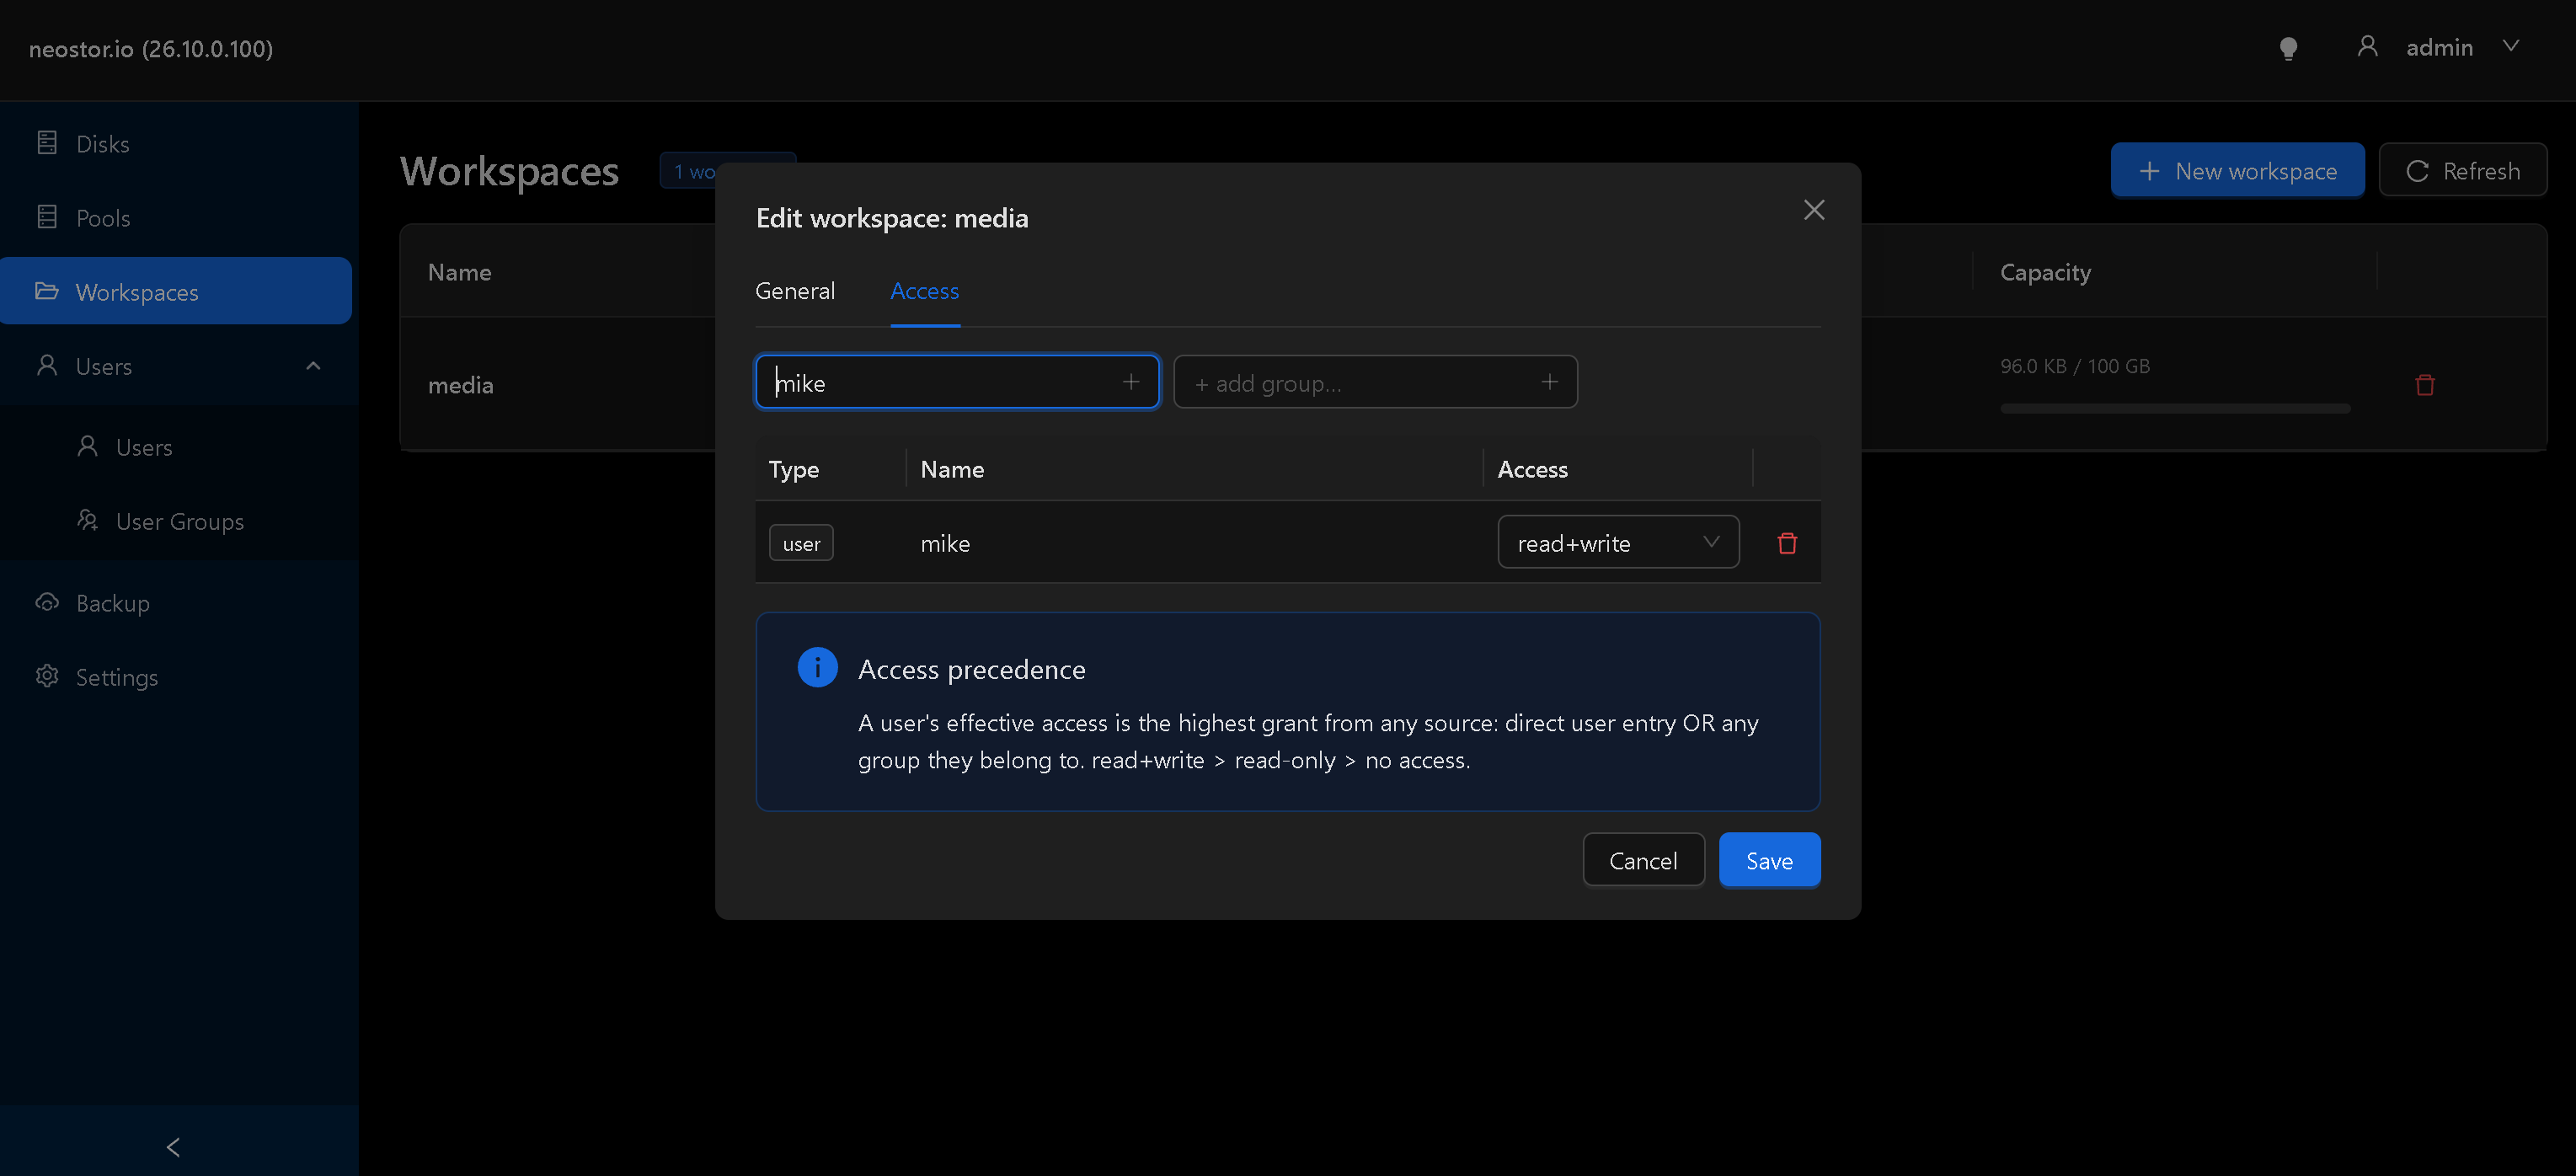
Workspace media: add mike on the Access tab, choose the required permission, then click Save.
You can now connect from a workstation using the account you created.
Keep management access on a protected network.
Restrict access to authorised users and devices. Do not expose the control panel directly to the Internet. Where traffic confidentiality is required, use suitable network protection such as a VPN or IPsec.